Tuesday, August 11, 2020

the easy peasy tank top dress

When I was a little girl, my mom made me three dresses from tank tops and what at the time was probably a half yard of fabric. I remember one in particular, a blue ribbed tank with a skirt of a red, yellow, and blue ditzy floral seersucker. I remember them as being my favorite summer outfit.


So imagine my surprise when I discovered that this is nothing new under the sun, and actually, someone had improved upon it? I wasn't really surprised, more like, oh how cleaver. Wish I'd thought of that sooner. 

I read two tutorials about how to make these,  but the clearest by far was from A Small Snippet's blog about making just the dress I'd had as a child. Of course, for a child, you end up not needing nearly as much yardage for the skirt, and the skirt on my dresses was short because I was playing in them.  Come to think of it, I'm not sure how my mother made the dress so that the waistband wasn't restrictive. I tried making another teeshirt dress with a shirt and an attached skirt, but it just didn't work.  I wanted something breezy and non-binding for a midsummer surgery, and I really wanted these to work. 

Enter elastic thread.

I used my Singer Precision to sew two of these dresses, and I was able to wind the elastic thread on my bobin using the machine bobin winder just like regular thread, no problems. The problem was I now have umpteen bazillion yards of elastic thread because a cone of the stuff was all I could manage to find. Pandemic problems, much? Unless you're planning to make several for yourself, your kids, the nieces, the neighbor's kids, the little Dritz package of elastic thread will suffice. Unless you've got another use for elastic thread in which case, go nuts, buy the big one. 

So, I've convinced you, you want to make one. Excellent. I'm not going to rewrite the tutorial here, but I will add these notes from my making experience that may make your life easier.

Materials you may or may not have on hand

A tank to cut up - As I said, I got mine at WalMart, I paid $3, if that? The fit for the green one is loose, the pink is more snug. 

Fabric yardage - you do need to measure, and you can measure either by using a tape, measuring your waist (or where your bra band is, if that's where you want the skirt to hit), and add half whatever that number is, OR you can go to the fabric store, and wrap yardage off the bolt one and a half times, and have them cut it at that spot at the cutting counter. If you're still confused...
Say a 40 inch waist, which means you add 20 inches to that for a total of 60". Which is roughly 1 and 2/3 yards of fabric. See, I practically did the math for you. There's also nothing saying that you couldn't use more yardage and have a fuller skirt, but I'm not sure why you'd want to? It's a giant tube, so it's not going to flair out at the bottom. 

Elastic thread - essential. Your waistband won't be elastic without it. Trust me. You need that waistband to have some give. Did I mention I had surgery? Did I mention I was ridiculously bloated beforehand? To the point I looked five months pregant? This dress had me comfortably covered. I'm also wearing them post surgery because they don't interfere with the incisions.  

Some construction notes - 

- Elastic thread isn't that scarry. It really isn't, and it's going to help you get that dress on after you're done sewing, trust me. 

- I wish I could have tried the tanks on ahead of time (dressing rooms closed, thanks COVID). I wouldn't have bothered with the green one, though it does do a better job of covering everything it's supposed to. The pink one not so much.
The lighting is horrible in this picture, but you can see there's a light colored stripe running around the front of my shoulder. That's where the tank doesn't cover my light pink bra. It's not just this bra, either, it's all of them.

For reference, I'm a 36F, and the tank is a 3X Time and Tru from Wal-Mart. I marked three inches above my natural waist on the tank (with a pin) for the skirt, which also happens to hit my bra band. For the skirt length, I measured my bra band to ankle length, and added about two and a half inches for seam allowance and hemming. Since you cut one of the selvage (woven side) edges off to get your length, I used the finished edge at the top to keep things neat, and hemmed the cut edge - it gave me an excuse to try the blind hem foot.  

- I took the extra step of finishing the inside of the pink floral gown by leaving a big seam allowance of the knit fabric, trimming down the print, and making a casing (French seam) out of the pink knit. On the outside, it looks like I have 1/4 inch elastic at the waist... but as you can see from the inside, it's really that small folded over casing, and three rounds of elastic thread keeping things snug but not too snug. I wore this pink gown to the hospital on surgery day with a little lightweight cardigan, and the waist band stayed up and out of the way of the incisions, which was the overall goal.

- The back seam of the dress is the only seam - aside from the bottom hem - that doesn't use the elastic thread in the bobbin. I wish I would have taken the five seconds to finish the raw edge of the back seam - it's just a nicer presentation, and it really is more comfortable to wear. 

 The tutorial I followed said a vent for a maxi dress was optional.
Hah.
 Save yourself the trouble. Put in a vent.
It doesn't even have to be that long,  I think the vent in this one is 10 inches at most? Just remember to mark how long you want the vent to come up from the raw hem edge, reinforce the top of the vent, and stitch the edges of the vent down. I did the back seam first, and back stitched at the top of the vent. I then clipped the seam allowance so that the vent edges were separate from the back seam and rolled them under, and I top stitched up one side and down the other, back stitching at the top of the vent. Remember how I said I was lazy? I should have finished the back seams while I was at it, and just reinforced the top of the vent while I had everything turned under. Alas. 

Last but not least. I don't have a picture of the waistband that you make out of the leftover bit of fabric you cut off the edge of the fabric. I end up tying them in a square knot because they're not long enough to make a bow. They also don't stay in place that well. I'm seriously considering making belt loops, either out of fabric or using some crochet cotton and making a little crochet chain I can stitch to the sides to keep the belt in place. Why the belt? It coveres the join, and it does make the dress look more finished. 

Tuesday, August 4, 2020

gym-ish shorts

I love these shorts. My mother says they look like pajamas and I shouldn't wear them out of the house... this may have something to do with my choices of fabric. Regardless, I sort of don't care what she thinks about it because they are so comfortable. They've been made for a while now, but I haven't gotten around to posting about them because life? COVID? They're probably two years old, maybe three. 


These shorts [for me, at least] fall into the category of Things-I-Can-Make-With-a-Yard-of-Fabric, or conversely 3/4 of a yard of this and half a yard of that. And some very rando bias tape. Something else I love about these shorts is that there is no pattern - shut the front door, I know! Here's the however because I can see you've already decided you don't want to bother without a paper pattern because anything without a paper pattern is too hard. If you have any kind of straight ruler, a measuring tape, a bowl, and either a few brown paper bags from TJ's or WF or a roll of wrapping paper, you, too, can do this. Pinky promise.

Some things to note:

If you're liking the shorts idea but don't really want your shorts to wrap around, check out this pattern from Purl Soho City Gym Shorts

I mashed up two patterns to do this; the instructions and pattern from a pair of shorts designed by Tara Miller and published in the Stitch Magazine originally and the measurement instructions for these Tap Pants [which I also have made]. I made the tap pants first, and then adjusted the tap pants pattern so that it had the lines I wanted for the gym shorts [tulip shorts, boudoir shorts, seriously, these things go by many names]. The Miller design wants you to cut out out the front fold over bit as two pieces, so that there is a side seam. If you follow the original, you can add pockets. Don't get me wrong, I love me some pockets. At this juncutre, I didn't want a side seam, especiallynot when I planned to use a solid for the back and sides where the seam would be obvious. The blue rose print would hide a side seam better. 

Making the side panel and back panel into one is simple enough. If the pieces are already cut out, simply fold the seam allowance bit over (if you're the type to include a seam allowance in a paper pattern - I am, I never remember to put it back in!) and tape the edges together, or if you're feeling very bold and daring, lay the two pieces down together on the fabric with the edges lined up and pin them to the fabric to cut out the pieces. You make have made a pattern alignment mark, such as commercial patterns have notches so you know where to line things up. That should help. 

And that's it! This doesn't really change the construction of the shorts, only that you've eliminated two side seams. 

Tuesday, July 28, 2020

Rag quilts

A while ago, and by that, I mean at least ten years ago or so, my mother got wind of the recycled denim rag quilts and decided she wanted one. So, we made one, and there's a lot of denim fabic left over - we were chopping up pants not fit for donation after all, and when people found out what we were doing, they gave us worn out pants... it got a little out of hand.

My mother loves that first blanket but I'm not such a fan. Mom always wanted it to have a "more finished edge", but with it being a rag quilt, I wasn't sure what to tell her. It's not like you are supposed to bind the edges of them. I mean, I guess we could...

Fast forward to today. Or, rather, a few months ago... maybe longer. While trawling Pinterest, I saw another version of a denim rag quilt. This one was labeled a mock Cathedral Windows [and to be honest, I can't even find the pin now].

Eureka, I've figured out what I'm doing with the rest of the denim.


Now, if you know anything about me, you know that I also lost it [all of it, fabric, batting, the works - I even forgot I owned that rotary cutter, come to think] and found it again [except the rotary cutter]. And it wasn't even part of my 2020 Find-it-and-Gitter-Done Top 10 challenge to myself! There were no instructions, just pictures. So I had to wing it, and you get to reap the benefits. 

Repeat after me: I DON'T NEED A FANCY ACRYLIC TEMPLATE. 

Materials:
- A CD or Mom's Corelle. It's the one that's about 6 inches across. A CD or DVD, or one of the plastic CD size pieces that sits at the top of a spindle of blank CD's work as well, they're about the same size. 
- Fabric of your choice, cut 4 1/2 inches square. You don't need batting, but I had some cotton bat kicking around, and I wanted to use it up, and it gives the quilting a little puff. It is a pain to cut with a rotary cutter, so you may want to skip it.
- Denim, cut into circles
- Pinking shears (for the denim)
Note: could you use a charm pack? Yeah, but that means the circle is going to need to be bigger, and that kind of maths is beyond me.

Figure out what size you want the finished project to be - I'm a wing-it kind of person myself, which often means I buy too much or not enough fabric to finish a project. I was going for a throw size, roughly 40 inches by 60 inches. 

-I think I had the equivalent of 8 fat quarters of paisley fabric, maybe 10. I can't remember now. As for denim, I think I had 8 - 10 pants?  

Method:
  1. Cut your squares and circles.
  2. Pay attention to your denim - as a twill, it has an obvious right/wrong side. With wrong sides facing, lay a fabric square on top of denim circle so that the corners of the square touch edges of the circle on all sides. If you're using batting squares, sandwich the batting square between the denim and the pretty fabric. Pin if you wish, and stitch down from corner to corner of the pretty fabric to keep things from shifting.  
  3. Choose your own adventure - finish sewing all of the circles and squares in this manner, or begin to stitch the prepared patches together as you go. I don't recommend this if you choose to wing it, because then you may end up with a concentration of one kind of fabric in one section of the quilt, and it just looks awkward.
  4. Sewing the patches together -
    Take two prepared circles, and lay them so that the right sides of the denim are together, lining up the straight edges of the squares. Make sure your quilting lines are going the direction you want them to, or don't. Pin if you wish.  
  5. Using the straight edge of the square as a guide, stitch along the edge of the square as close as you can without sewing the square down. Now, there should be two half-moon looking flaps of denim flopping around between the two squares.
  6. Fold the denim flaps down towards the pretty fabric so that they lay flat, press or pin, your choice. I used a zigzag stitch to sew down the flaps, as close to the edge of the denim as I could get. 
  7. Repeat steps 5 -6, sewing together prepared circles and stitching down flaps. Eventually, you're going to get to the point where you have long seams and you're stitching down a lot of flaps at once - if you plan ahead, you can turn the project so that the flaps are sewn all at once. 
  8. Once the desired size is reached, fold down the edge flaps of the project and sew down all flaps. 
Et voila! you're done! 

I'm not that far along in the process, but that's how I'm going to finish when I finally do. 

larger pieced squares


Sunday, July 12, 2020

quarantine quilts


Just a quick look at some of the projects I've been working on through quarantine. The three finished quilts have been half done for several years now and I finally found all the pieces and stitched them together July 4th weekend. I finished the green cat rug evening watching TV over about two weeks, and now it's beside my bed; it's locker hook. The denim paisley and the blue bunnies are actually further along, but this is the only picture I have of them on my phone. The three finished quilts may all get one more border on them, I'm not sure yet. 


Sunday, March 22, 2020

Quarantine, day 8?

According to my friend who is quarantined in Arlington, VA, it's been over a week now that we've sequestered ourselves in our dwellings and began hoarding toilet paper. Everyone except my family, because we needed to shop on Friday like normal, so we put buying TP off until then, and couldn't find any for a week. My Arlington friend is definitely more extroverted than I am; the only change to my routine is that I don't have to go to work at my GA job; I'm focused on what were already online classes.

Fine people, some of you are not in education. Some of you take vacations this time of year because 'rates are lower', or in the fall after tourist season, or whenever you bloody well please because your vacay time doesn't have to occur within a mandatory window of June, July, and August. With the exception of the one time I went to England in 2008, have not been captain of my own destiny enough to afford to go on a vacation anywhere other than my parent's house. Or the yearly encampments at Old Fort Niagara and Cook's Forest. Not exactly exotic, and always when I already have time off from school. This whole staycation taking place not over a holiday and not in the middle of summer is a revelation.

Holiday vacation is not a vacation. At least if you're the person partly responsible for making holiday festivities happen. It's a time and a half job. Holiday vacations aren't nice. This? Holy cow. THIS IS SO NICE. I HAVE A RESPONSIBILITY TO NO ONE TO MEET HOLIDAY EXPECTATIONS.

I sort of actually like being outdoors this time of year. Keep your sunscreen, beaches, relative humidity of 99%, and skin cancer. Right now, the outside temperatures are all over the place, 60 and sunny one day, 26 with a wind chill of 15 the next. Welcome to spring in my neck of the woods. But the world is coming alive out there. Our crocuses poked their heads up and have been nodding in the brisk breeze. Buds are preparing to burst on branches; the quince, the sassafras, the flowering almond, those weird bushes on the side of the house that we've never been able to properly identify. On alternate route home from picking up flea medication for the pets, my mother and I saw pussy willows. There's been nothing to stop anyone currently from sitting outside in their yard except the wind chill, which I fully plan to do, with a roaring fire in the brazier. I bought the thing, I may as well get some use out of it if events are going to continue to be canceled. 

While I do have to stay on top of coursework, I have no intention of keeping myself parked in front of a computer terminal just so everything can be turned in ahead of time (though this isn't a terrible idea...) Because of the nature of my GA, I haven't had a proper break, even over Christmas, because we have to come in and work a high vigilance job anyway. And now we don't. Frankly, it's a relief. I don't feel like I'm vibrating or mentally numb anymore. When this whole thing was beginning to blow up, we were told that face-to-face classes would resume April 6th. Now face to face University and ecumenical activities have been canceled indefinitely. I'm okay with this.


Thursday, February 13, 2020

A Little Gothic Revival

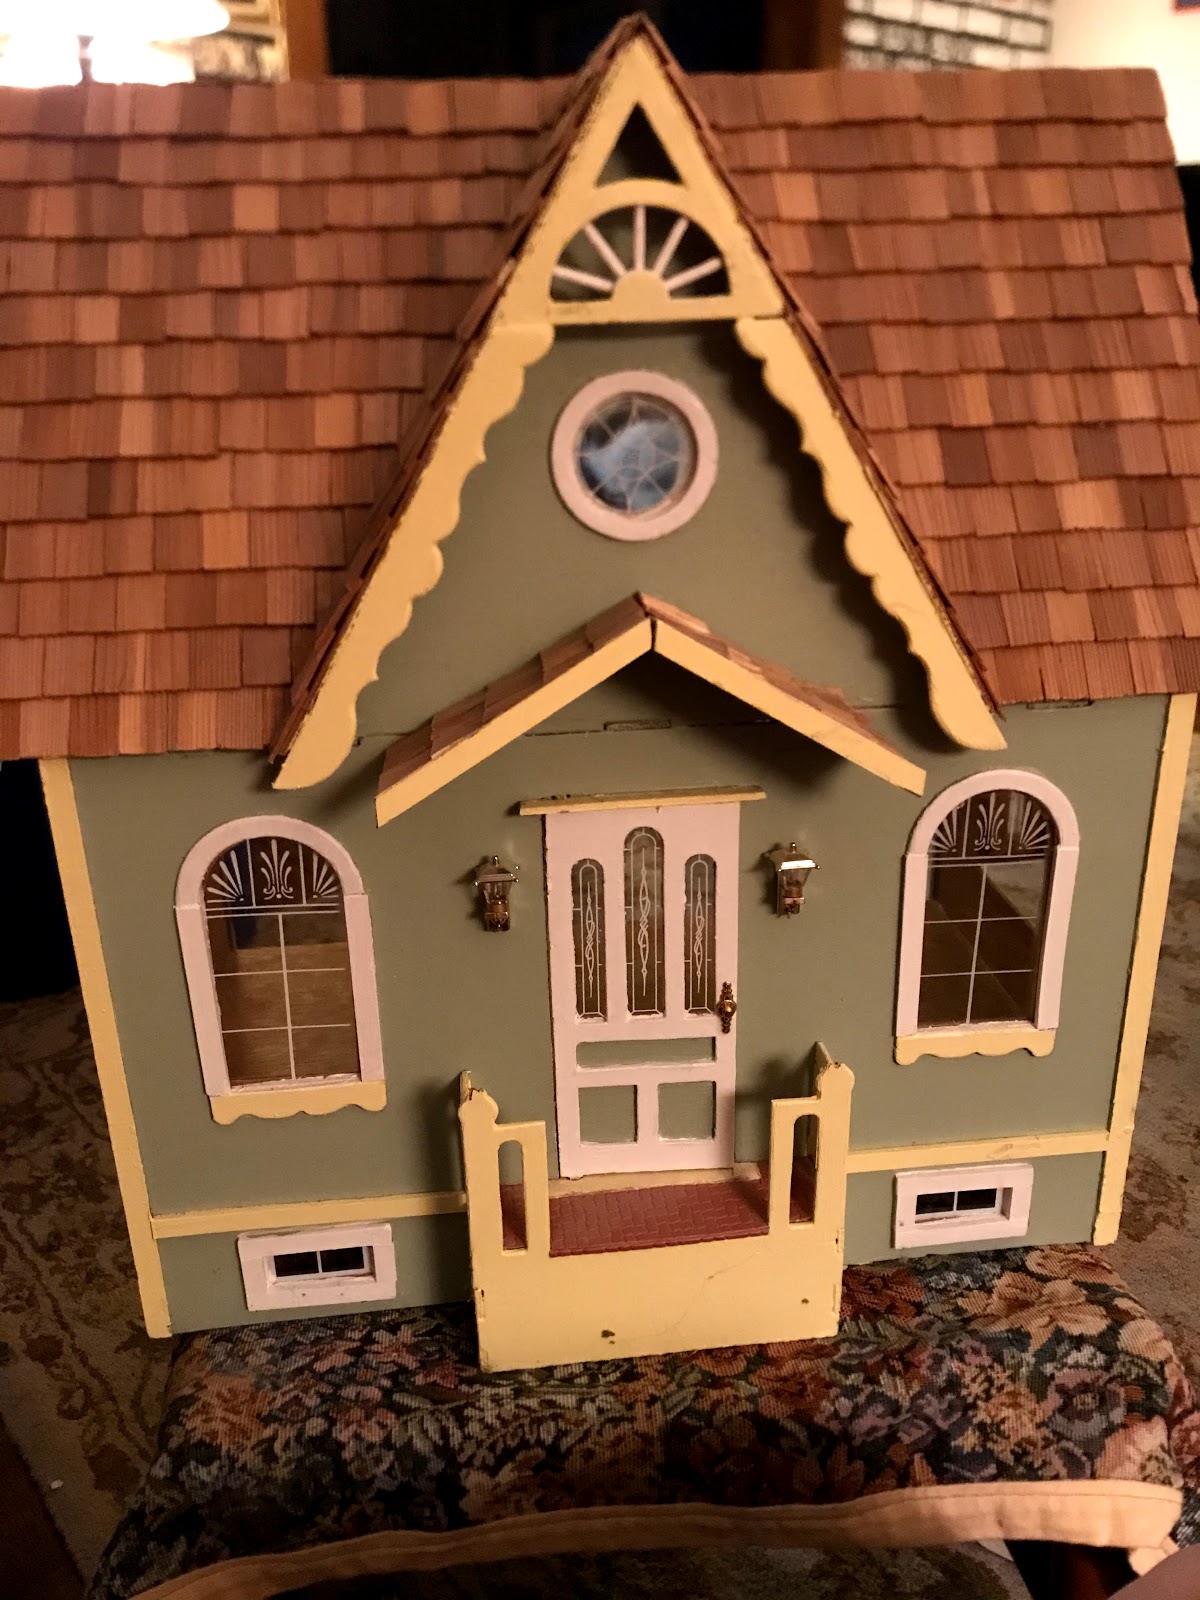
I found this little Gothic Revival slot-and-tab construction dollhouse at Goodwill in February for $10 in an obvious state of pre-loved. As I examined it later, I suspected there were some elements missing from it, so I did a quick search of the company I suspect produced it, Greenleaf. Unfortunately, there isn't a photo gallery of discontinued houses accessible to the general public - you have to create an account and log onto their discussion boards to find it - so I have no idea if this is one of theirs or not. The closest house Greenleaf makes currently that matches this is the Buttercup. As far as I can tell, none of the current Greenleaf houses have basements or the illusion of a basement, as you can see from the front of the house where there are two basement windows. 


My first steps are to shore up the front porch. I can't find a picture of the house for construction purposes, so I have no idea if the porch is missing a support pillar or not, but the right-hand side of the roof took some damage, and something broke off the porch railings. 

Thursday, December 26, 2019

Project of the year, 2020

Well, howdy. Its been a while.

I've been pursuing master's degree #2 which hasn't left a lot of time - or let's face it, interest - for writing outside of the academic. But it's winter break now, and I've caught a moment to breathe.

I've been hearing rumblings about the new Pantone color, the latest this, new year's resolutions et cetera, and it made me reflect on the projects I have in progress and the ones I completed.

I actually finished a Dr. #4 scarf! And I gifted it! I have a picture of it done; I'll post it eventually.

I also finished a pair of mittens and a hat which were also gifted. And I knit myself a new hat and cowl set, and a hat to match another cowl. [None of which I have pictures of, of course.]

A little extra space was found to set up the sewing machine, and while I really wanted to start something new [don't we all?] I took a look back and began digging things out that were partially completed. I finished the top of an I Spy throw, and in the process, I ended up donating a 30-gallon trash bag worth of fabric to a charity that makes small lap and lovey blankets for nursing home patients and children in crisis. I could have easily given more; I may yet. I felt such relief in letting it go and knowing that it would be put to use instead of being mouse eaten, dry rotting or molding in storage until I got to it. In this mess of donated fabric, I found a partially completed quilt that had been given to me to finish, one that I knew I never would. It had been given to me by someone parting with their mother's fabric stash. I have already come to a standstill where it comes to buying more fabric to stash. I'm working on not buying any more yarn unless it's to finish a project, which is a hardship given that there's this new, scrummy local yarn shop with fabulous fibers.

All this got me thinking:
Do I really want a legacy of half-finished projects?

That said, my goals for 2020 are to finish some projects that I already have started:

  1. Finish hand quilting a utility quilt - confession. I'm not even sure which project I was referring to. Maybe the orange marmalade one? 
  2. Bind two matching green quilts - I know exactly where these are. Under a bunch of mask making supplies. 
  3. Finish a green 18th-century jacket   Done and done! :D
  4. Finish the 18th-century linen gown   Its done! I finished it for a weekend event 10/24/ 2020!
  5. Finish the 18th-century worsted wool gown - So. Stinkin'. Close. (I'm not sure when the last update of this was, but now as of 10/30, it's even closer to being done than it was when I last updated this)
  6. Find the missing Row By Row from 5 or 6 years ago [whenever the water theme was] Located 3/2020
  7. Find the missing Cathedral Windows rag quilt Located! currently working on finishing, 7/2020
  8. Find the missing Asian bunny squares  - these have been located! 2/8/2020 (Confession, I started buying fabric to complete this project, after researching what I wanted to do with it)
  9. Fix my mouse nibbled hat [this may involve buying fabric!] -  This has ALSO been finished, thanks to a sewing weekend get away with friends! Now it needs to be trimmed, to cover the mouse eaten bits
This ought to keep me plenty busy for the new year.

This post originally published on 12/26/2019, updated 7/28/2020, 10/30/2020

Saturday, May 18, 2019

Wool grab bag

Okay, so this is not an affiliate links post, I'm getting absolutely no credit from Jimmy Beans for posting this. This was the first time I've ever ordered a mystery grab bag of any kind [and I've had zero luck with mystery projects...] so I thought I'd post my thing. It's sort of like opening Christmas. I ordered the grab bag because A. it was on sale [41% off!] and B. I was ordering some wool sample balls for another project. So, why not. 
If you live on the west coast, Jimmy Bean's is in Nevada, so it would probably come faster than three days - AND I'M NOT COMPLAINING ABOUT TURN AROUND. They offer free shipping on orders $75 or more every day, so when I order, I try to order $75 of yarn, but this time I had a free shipping coupon code. Yay coupons. 

Also, they have great customer service. Which I feel is important for e-commerce. 

The mystery bag promised
 400g of yarn, a couple notions, a project bag, and a pattern. 


400g of yarn, some notions, and a project bag delivered.
Obviously, not pictured is the pattern. 
Honestly, I probably never would have ever bought cable needles or a wool soak. And I usually make my own project bags, but it's a nice little project bag, and I'll keep it because it's making a direct knitting reference. I'm glad they were upfront about the fiber content - the website says primary fiber is wool, and then where it says specific fiber: varies [this isn't just for the mystery color bag, it's for all of them]. I was a little dubious, fearing that I would get a bag of exclusively wool+acrylic blends, but as soon as I saw the Madelinetosh I knew it wasn't so. I'm a self-proclaimed fiber snob and I was kind of hoping I'd have a bag of exclusively 100% wool to work on this other project I've got, but no matter. The wool blends will be used for charity projects, probably cowls. 


Mitered square blanket


Original publish date, May 18, 2019
This project has outgrown the Basket-of-Currently-Working-On, and lives in one of those folding knitting baskets of yesteryear... and I mean yesteryear, it's turned wood dowels and in all honesty, is at least on its third fabric basket incarnation  - the one I removed because it was literally disintegrating looked to be circa 1970s.  

Back to the knitting project. 
[If you're on Ravelry, here's a link to my project page for this blanket]

Yes, there's a story behind why I started this, but I don't remember what it was. Probably something to do with having leftover bits of worsted wool from projects and not wanting to make a scrap hat/scarf/whatever. A friend cleaning out her stash gave me the natural colored wool, two skeins of Lion Brand's Natural Fisherman's Wool in Oatmeal. She had already used some of it to make wool dryer balls, but I wasn't in the mood to nit-pick over free wool... She had also tried dying said wool a vibrant amethyst purple, which had a negative impact on the wool fibers [you can see an exemplar of that wool sample in the middle row, third square down from the top]. Every few inches the yarn either grew thin or one of the plys had disappeared altogether, needing to be cut and rejoined.  

I started out not actually knitting mitered squares but trying to knit squares as samples of stitches. Which didn't last long, they weren't uniform in size and there were issues with the gauge I was too lazy to work out. 

The squares themselves are fast and easy to knit up. 
Some things that were not easy - 
Remembering that I was using size 6 US needles. [Update, 2/8/2020 - I'm glad I made note of this, it seems I've been condo knitting this project with anything between a 6 and a 9! >_<]
Remembering exactly how many stitches were in each square - 25, if you're curious. 
Remembering which side to begin the cast on so that the little miter ridges aligned - yes, it matters, and I had no idea for the first 4 rows or so what I was doing. 

The squares don't take a lot of yarn, at least knitting up a 3" square with size 6 needles and 25 stitches. I believe my initial thought was to use scraps of wool up but to be honest, I don't have that much wool laying around, and the thought of having this thing laying about unfinished for potentially years was an unpleasant thought. I started looking for scrap ends of wool yarn. 

any idea how hard it is to find scrap ends of yarn? pretty darn. 

Enter [shameless plug] Jimmy Bean's Wool and their 15-yard samples of Malabrigo worsted - and 15 yards is still more than enough for one of these little squares. I've purchased 29 different samples, and I think I'm finally close to maxing out this source of scrap [what am I doing with the leftover leftovers? Turning it into a giant yarn ball...].

Here are some picture updates! Okay. One picture update, one that's really of my cat, but you can sort of see the texture and the colors. I will have to take some close up pictures of some of the squares.  


Monday, May 13, 2019

Marmalade

I have no idea what possessed me to make marmalade. But I did. And, like most things homemade, it tastes amazing.
Pictured (from L - R) are the star ingredients - a tangerine of forgotten origins, a Cara Cara orange, a blood orange, and the inside bits of a second Cara Cara. Plus the saved, julienned rind of another orange (Cara Cara? Navel? IDK) 
A quick Pinterest search pulled up a daunting list of recipes. Without wanting to bore you, dear reader, with stories of my youth connected to orange marmalade, or where I first had it, here is the recipe. Important notes will follow. 

Ingredients:

4 oranges (I used three different kinds to impact the flavor profile)
The julienned rind of four oranges
Juice of half a lemon, plus julienned rind if you feel like it. 
2 cups of white sugar
2 cups (16 oz) of water
1 tbsp vanilla

Materials

Large spoon
Microplane or v. sharp paring knife 
Medium saucepan
V. Sharp paring knife
An immersion blender (optional)
Bowl for peel, fruit pieces 
Citrus mauler or juicer
Candy or another food thermometer (optional)
Timer or favorite time keeping device- I’m a huge fan of Hulu or Netflix (one 45 minute episode is about how much time it will take for the jelly to cook)
Clean Glass jar/jars to store product!

Any necessary canning equipment, such as water bath, canning funnel, et cetera, if you plan to preserve some of this goodness for later. If so, wash jars and bands/ glass lids in hot soapy water, and sterilize. I wash, then throw everything into the canning pot, and let it come to and boil as I prep and cook the ingredients. Bringing the water bath to boil and boiling for 15 minutes usually takes the same amount of time it takes to prep and cook. Also, boiling jars more than 15 minutes never killed anyone. 
*this recipe makes exactly 7 (seven) of the tiny, 1/4 pint Ball jars (that’s like 4oz per jar?)*

Method

*if you are planning to preserve the fruit of your labor, set the water bath up now, with the jars and lids inside with enough water to cover them by two inches, and for heavens sakes, don’t forget to turn the burner on 😉)*

Wash citrus in warm water to help remove any wax (it’s food safe but still. Eww). With a paring knife or Microplane, remove as much of outer rind without white pith as you can. The pith will make your marmalade bitter, so adjust to your own taste. Chop rinds into small segments if you have ribbons, about 1-2 inches long. 
Peel citrus, removing as much of the white pith as you can. Break apart the fruit into its individual petals. Chop fruit into smaller pieces, about 1 inch. Citrus does not need to be separated from the membrane, just remove white pith and seeds. Cut the lemon in half, zest outer rind and add to the orange rind, juice lemon, removing seeds.

Put fruit and water into a saucepan on medium heat. Incorporate sugar one cup at a time, stirring until dissolved. (Or throw it in all at once, but make sure you stir!); add vanilla.
***

At this time, it is important to remember that basically what you are making is a jelly. This takes more time than you might think if you haven’t done it before.

This is where setting a timer or Netflix comes in handy. Set a 45-minute timer or put on a 45-minute episode of something you wouldn't mind watching again and are fairly familiar with already. For me, this could be an episode of Star Trek, Firefly, the early seasons of NCIS or the BBC's Father Brown or Death in Paradise [crime drama much?]. The length of the show [45 minutes] is about how long it's going to take for the sugars and fruit to gel, maybe a little longer, and if you're anything like me, standing and stirring molten sugar water for 45 minutes gets boring. The thermometer is also handy, as jelly happens at 220* F. The jelly needs to be stirred or it will scorch, hence the familiar story.
Once the marmalade has reached 220*, it's ready! If not canning, funnel into a quart-size glass jar and cap. Let cool before refrigerating. [why glass? it doesn't leech chemicals when exposed to heat, unlike plastic]

If canning, ladle into glass jars one at a time; wipe rim, place lid and secure ring, replacing in water bath. Process for 15 minutes. Remove jars and listen for that magical pop sound; check that lids have sealed by examining the lid's dimple. If it's down, you're good. Anything that did not seal will have to be reprocessed or put in the refrigerator.  I didn't have 7 containers, I planned for 6, so I hastily cleaned a small glass jar that had pesto in it, and funneled the last bits of the marmalade into it. Paddington Bear would be proud.

If you're still confused, check out Alton Brown's marmalade instructions - his recipe will make more than mine, but he actually teaches you to cook, and tells you what to look for.