Thursday, September 27, 2012

backroom quilters


Midday. Thursday.
C.C. Mellor Library.
1 Pennwood Ave,
Edgewood, east end of
Pittsburgh.


And since it's fall, it's raining.


Could the day be any less inspiring? It’s Thursday. That means it’s time for the Back Room Quilters demi-guild. Quilters may be a friendly bunch, but we can be a little difficult to locate initially. I discovered this group accidentally because I was cross referencing something completely different that I had seen on the Pittsburgh library’s calendar of events. Since Edgewood was, or in actuality still is a separate municipality that has it's own library and police force among other things, the events aren't listed on the Carnegie Library of Pittsburgh web page, though Edgewood has a Pittsburgh mailing address. Semantics.


Needless to say, I was very surprised to learn about a group of quilters meeting at a library within a reasonable driving distance of my own zipcode [at the time, walking distance from my house], and at the first opportunity, I headed over to the C.C. Mellor library to check it out.

Except that there is no sign posted anywhere in the library that says a group meets there weekly, contact thus and so if you are interested in joining.  What also throws a newbie off is not only how to find the room, but the “Emergency Exit Only – Alarm Will Sound” warning on the door latch. Right… However, if you wait long enough, and you have a quilting badge of identification with you, such as a hoop, someone will come along and say, "Oh, don't worry about the door. Pleased to meet you, you look new..."


I say demi-guild because they don’t have by-laws or charge dues. They do, however, collect a donation for the library. We are, after all, borrowing their space for three hours, from 12 – 3, and almost everyone brings lunch. And if it's your birthday, you bring a treat to share.

Something of an apparent rarity is a group project, though about eight of the women are working on a tessellating stack-and-whack, being taught by another woman in the group who works at one of the local quilt shops, using materials from classes she has taught in the past. I should have gotten in on this but I figured I was a grad student, I'd be too busy. Now I wish I had raided the stash for something, or run down to LOOM for another yard or two of the STAR WARS  fabric I was freaking out about last month. That would have been awesome, something like a talking heads quilt or something... In any case, it's been a great 3 hours to get some work done quilt-guilt free. I'll miss it next semester.

Wednesday, September 26, 2012

just keep knitting

The chill has returned to the air again, and so, out came all my scarves and hats and accessories; I was very excited about this. I knotted a red scarf around my neck as I headed out for class last night, and all the way there thanked God I had called the mechanic, because in addition to a weird noise, the car had a weird smell. Then I got into the building and realized the weird smell was coming from my scarf. Ahhah. Gross.

So all of it took a spin in the wash last night as soon as I got home from class, in the cold water wash of the delicate cycle, and went immediately into the dryer on the fluff setting so it wouldn't mildew. Not that it would over night, but I wasn't taking any chances. It's fall, and the laundry is in the basement. 

Of course I forgot that the pony tail hat that I knit a few seasons ago was in that load, and that it's fibre content is 100% merino wool and shouldn't have gone into the dryer on the fluff setting, so it felted. It used to be all lovely and cover my ears, and now as you can see, not so much. How the hat made from the raspberry coloured 100% merino wool that I purchased in Britain made it through the same laundry cycle unscathed remains a mystery, but it looks like I have to make myself a new pony hat, at least, if I want my ears covered. It is snug to my head now though. That has it's perks

Fall tends to be my knitting season. It's getting colder, the thought of holding something warm like wool isn't so onerous. I learned to knit in the fall... okay, maybe it was closer to the winter, but it was the fall semester of undergraduate. 

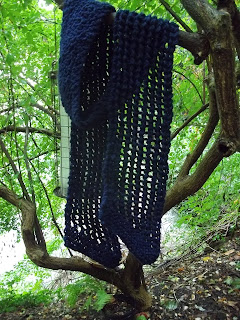
I was looking for something fairly simple and mindless to work on while I was waiting for things; like appointments or class to start [I can knit and read at the same time - mad, mad skills] and I found a pattern for a 19th century honeycomb scarf which was so remarkably easy. I used 5.0 mm circular needles with a worsted weight yarn of unknown fibre content [I'm guessing an acrylic] in a dark navy blue. So, so easy. It came from the book "Sock Yarn One-Skein Wonders", edited by Diana Foster. Lots of other nice projects, but it was from the library so it had to go back before I could delve into any of them further.  


My only hiccough was the yarn over. The picture in the book showed this lovely open work, and when I began the honeycomb, I had this chunky looking stuff instead.  What?
I first learned to yarn over by wrapping the yarn completely around the needle; so that there was a loop that forms a little X on the right hand needle, before beginning the next stitch. Which when making lace, this method eliminates the hole that you are supposed to be creating, which was what I wanted to be able to create this open work. I had to frog my work several times before finally figuring out that I needed to bring the yarn over the top of the needle, not under and over in a loop and X.  Once I got past that, it was smooth sailing. Live and learn.

what's up next on the knitting needles? hmm... I'm not sure yet. But I have this aqua alpaca I've been dying to give a go. 

Saturday, September 15, 2012

bookshelf, bookshelf on the wall...

What would a blog about quilting and fabric be if there weren't things like this? I saw this in the library and had to have my own copy, because, if you can't tell from the cover, the illustrations in this book are thread paintings.

Snow White and the Seven Dwarfs

Adapted by Joan Aiken, illustrated by Belinda Downes

DK CHILDREN; 1st edition (October 1, 2002),
ISBN: 0789487993

Anyway, I'm not sure of the legality of photographing the pages and posting pictures, so I'll refrain, but even if you don't have a small child in your life, look this book up at a library; Ms. Downes went to splendid effort breathing life into this story. 

KURA-lura, or HOW TO have a faux four poster or Dutch bed in a low ceilinged room

www.ikeahackers.net ; search "kura". Ikea hackers can be an interesting website to peruse - some of the hacks are unimaginative, and others took some serious thought and effort to plan and execute. Kura, the subject of my lackluster hack, is no exception. A lot of parents have gone great lengths to turn this puppy into something epic-ly fun for their children, others have gone a simpler route and spray painted it and used spray adhesive to transform the electric blue sides with wallpaper. Which I may yet do...

I don't have kids. I do have tiny studio apartment with a really low ceiling [less than 8"] and limited storage space. A traditional loft bed for me was not an option, and neither was the curtained four poster bed I was romanticizing, either. I spent long hours looking for beds on Craig's list, stumbling around the internet and Pinterest researching bunk beds and lofts, before a friend mentioned that they had this KURA in their attic, and it was free for the taking if I wanted it. I love the word "free"

At the end of this post is a list of almost all materials utilized for this project. Bear in mind this has been a work in progress for almost a year.

Yes, this is a toddler bed, technically, at least, in this exhibit A state. I think when it's flipped the other way, with a thin mattress, IKEA is figuring that a young child, maybe max age of 7 or 8 would sleep in this bed on top [for safety reasons], and a younger sibling on a thin mattress could feasibly sleep below, though there is nothing to purchase from IKEA that would be a base for the second mattress that would turn this into bunk beds. Something like a captain's bed base with drawers or you know, something that is cleaver in that "minimalist, maximize space" IKEA way that would pack flat and could also be used as a separate unit from the KURA. Digressing. Sorry.

As a creative person, I have a lot of stuff, and as mentioned, I have pretty small apartment for a crafty person. This is a tough little loft. It belonged to another family before the one I got it from; 4 kids total, all under the age of ten in the last 8 years. But it was FREE [perk #1], and since the age demographic this bed was made for has certain safety considerations that must legally be taken into consideration, it's short [perk #2]. Did I mention that at just under 5'5" I can touch the ceiling of my apartment with my outstretched arm? No tiptoes involved. A regular, adult sized loft was not an option, unless I wanted a nosebleed or concussion after waking suddenly in the night.

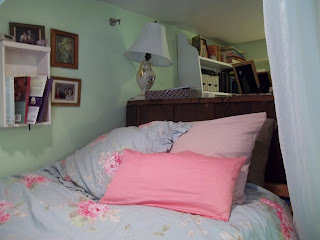
Nothing about the KURA bed has changed; I didn't add anything, I haven't taken anything off. So this isn't a hack as much as it is a cover up. I wanted to cover up the bed for sleep hygene reasons; the curtains help darken the sleeping area, and create a sense of separate space from the rest of the room, which makes the brain think "this area is for sleeping, and sleeping only". In a studio apartment where you can't take your computer or sewing machine out of your bedroom/diningroom/livingroom, this is important. Part of the curtain thing was always wanting to have a canopy bed. So I was trying to fufil some long repressed desire held over from childhood.

Also, I wanted to hide the bed. Something about having it out in the open. I don't know. I thought it sounded weird with people over. "Here's the desk, there's the couch, yep there's my bed..." sort of sounded like I was still living with my parents. 


So here is what I did... I flipped exhibit A upside down, so the long blue section was on the top.
The bed is constructed such that you can loft it as you please. There is no room on the top of this bed for a box spring plus a real mattress, so the box spring went below. Also, when we put it together, we flipped the blue panels to face inside [because I hate electric blue]. And I bought a stool [from IKEA!] to get in and out of bed, since that ladder on the side was just not going to cut it. Also, as you can see, I have a cat, a very social cat, and The Lyd does not like to be left out. Of anything. There is an Eastlake dresser beside the bed that she can hop down onto, and then she uses the steps.


How, then to hang the curtains? The bed is in a corner, and initially I wanted curtains on the two remaining sides, so I tried a cable curtain rod pulled through a ceiling mounted bracket on a 90 degree angle. This didn't work out so well - I couldn't get the proper tension on the cable, so the cable sagged and pulled the bracket out of the ceiling. So I took the cable down and I trotted back over to the hardware store and purchased a second ceiling mount bracket for hanging a curtain rod, which are clearly meant for a much thicker curtain rod than a bamboo pole.

Then I hung the curtains. White was the obvious choice since it goes with everything, and would be easiest to pick up at the store, thrift shop, sale aisle, et cetera. I did screw two cup hooks, one on either end of the bed for a curtain tie back, to hold the curtains back if I was in such a mood. I have 4 crushed voile pannes, plus a white textured sample panel. I've since removed the pink panels, which clashed with the green paint, and instead put up two dark green panels on the ends which came with the apartment and compliment the color scheme, for a total of 7 panels in all.


The only thing left to do was hide the under the bed bit. Storage is at a premium in this place, and since no one uses the box spring regularly, I store things below. A tension rod with 4 panels sufficiently covers the space. If this were a hack for a child, I would have purchased closet railing hardware and secured a rod to the bed, because every time I go on a fishing expedition for something, the rod falls down on me, so I've learned to remove it. Otherwise, the pressure rod is sufficient for keeping the below deck hidden


One last detail... if I'm sleeping 'upstairs', what did I do for a headboard? There's a bookshelf, not from IKEA, at one end of the bed, pushed against the end. It's solid, and serves the purpose of keeping the pillows propped up.


Materials List
PLUS
Total cost of materials  for this project:

BEKVÄM step stool, IKEA, $14.99
2 ceiling mount curtain rod bracket hardware, Home Depot, $20
5/8" spring tension rod, 48"-75", Wal-Mart, $6.97
 4 cafe curtains + 4 valances (used in apartment elsewhere), garage sale, $4 for all
2 Canopy crushed voile curtain, Walmart, [clearance] $4 total
Room Essentials Crushed Voil pannels, yard sale, $2 total
2 Waverly green curtain tiebacks, Joann Fabric's [super clearance], $1
bamboo pole, mom and dad's garden, free
KURA bed from IKEA, friend's attic [aparently also very easy to find on Craig's List] free
2 green curtain panels, came with apartment, free
that brings the total cost for materials to $52.97.

The blue duvet and sham was picked up on clearance from Target; part of the Shabby- Chic line, for $24. The throw pillow is covered with an old button down shirt from my closet that I wasn't wearing any more that just happened to match the flowers. The shelf with the books is an old orphaned drawer that I picked out of the garage of my last residence before we moved. I sanded it, primed and painted it and nailed a hanging bracket under the lip of the drawer front. 

Tuesday, September 11, 2012

star wars. STAR WARS!!!

be still, my geeking-out-last-to-know soul. 


 be still.


Monday, September 10, 2012

meatless monday: phenomenal eggplant tomato pie

I have ingredients, and then I get hungry and realize I forgot to cook. Except for a few days ago, when things started falling out of the freezer and I said, "oh, I remember making that...", like the mini pizzas I made from frozen dinner rolls.

Tonight's dinner comes from the Penzey's Spices catalogue; alas, I don't know which one, as I ripped the page out and stuffed it into my recipe binder. It was submitted to the spice catalogue by Emily Guertin of Cambridge, Massachusetts, who says "This is a tasty breakfast, lunch, or light dinner!"

It is, essentially, a quiche, and this, with fresh produce coming in and farmer's markets everywhere, the perfect time to make it. An easier to follow set of directions than mine can be found at Penzey's web site for Phenomenal Eggplant and Tomato Pie. I assume the provided nutrition information includes the made from scratch pie crust recipe included...?

I added onion and a small sweet red pepper to this pie that magically appeared on my doorstep. It's that time of year.


  • This calls for 3 eggs, which are inside the container of milk, which, as luck would have it, contained *exactly* the right amount of liquid for the recipe. So I threw it all in there and danced around the kitchen to some music and shook the container instead of beating it with a fork. Way more fun. I chopped all the veggies as directed, and then I quartered my eggplant just because I dislike fighting with my food when I'm trying to cut it later.  


add the tomato to the eggplant for the second roasting and toss.

"divide and conquer" into equal portions for layering into the pie

sprinkle on the Parmesan cheese

I don't have the Tuscan Sunset spice blend, so I made something up consisting of basil, parsley, salt, black pepper, onion and an Italian salad sprinkle spice blend.

and some extra parm cheese. unless you're allergic, you can never go wrong with a smidgen extra cheese. I'm still inside the 1/4 cup recipe guide lines. 

into the oven to bake for 30 minutes. I did go back and wrap foil around the crust.

since the recipe calls for 1/2 a medium eggplant, and I didn't want to waste a hot oven, I sliced up the whole eggplant, and roasted the rest to use for eggplant parm later [trying to go lower cal with out the breading and frying] and a yellow squash that magically appeared in our unlocked car at church... it also meant that I got some extra mileage out of the olive oil left on the pan from the previous roastings!

some more info on the phenomenal eggplant tomato pie:

Prep. time: 35 minutes including baking of eggplant/tomato slices (+ 20 minutes if making pie crust) 
Cooking time: 30-40 minutes 
Serves: 8 

Nutritional Information:
Servings 8; Serving Size 1 piece (97g); Calories 200; Calories from fat 120; Total fat 14g; Cholesterol 100mg; Sodium 350mg; Carbohydrate 15g; Dietary Fiber 1g.

more importantly, was this tasty? would I make it again??

Yes. This was pretty tasty, although a little time consuming - I would plan ahead and buy a pie crust next time insead of going a la scratch

Thursday, September 6, 2012

a children's travel book

I had to create a children's book about a country for a class this summer, which I took pretty seriously. I'm not a paper writer, but I can decently collage. There were four of us in the class, and we were looking at the books available in the library for guidance for information - how do you interest a child in another country?

M. Sasak wrote a fabulous set of books called the "This is", starting with "This is Paris" in 1958, New York,  London and Rome in the 1960's, these four books being the most popular in the series, which includes Greece, Australia, Edinburgh, San Francisco, Israel and Washington, DC to name a few of the others. My favorite of his books is the copy of "This is New York" that belonged to my mother, with annotations in her young adult hand under the illustrations about "We drove by this billboard all the time" and "I used to go to this museum with Dad every Saturday". But I digress.

M. Sasak I am not, but I like the feel of his books, which include anecdotal information about a place.


The illustrations are a combination of hand-colored, computer print out, paper collage and stickers. Some of the headings were done with a calligraphy pen. The book itself is a 12"x12" post bound scrap book covered with a fabric sleeve. Had someone else in the class not chosen India, the scrap book would have looked appropriate for that service. I'm not sure if this style of fabric is appropriate for Kenya specifically, but it is African, as compared to say, Aboriginal Australian.  
 
To complete this book, I will add information about Kenya's landscape - that it has several different altitudes from sea level to mountain peaks, and therefore different temperatures through the year (which is also effected by the breeze coming off the Indian Ocean). I'm hesitant to add information about who Kenya is politically allied with. None of the children's books I've read have included that information.
 
Some of the pages in this book are a little cluttered with information, and some of them look a little bare in comparison. However, the professor was pleased with the final product, and suggested that this come along with me on interviews as an example of the kind of work I do. In looking at the books for children, it was difficult to find one that talked about India, Polynesia, Africa, or South America. Or Eastern Europe, former Soviet block countries, so if I were trying to round out a classroom library, I would focus my search on those places first for books already in print, and then see if my students and I could do a little research of our own, especially in light of the global market place, and rising countries such as India and China.