Saturday, March 31, 2012

science experiment

This blog is usually about sewing quilting, however, in the interest of my own memory as well as documentation for class, I'm submitting my rock candy experiment, which I will be tracking for purposes of science over the next few days.

my recipe came from candy.about.com

materials:
2 cups of water
4 cups of sugar (a 2 pound bag works in terms of quantity)
1 medium sauce pan
a rubber or silicon spatula or spoon
1 glass mason jar, 1 1/2 cup qty.
one clothes pin, pref. the spring loaded variety
one bamboo skewer or disposable chop stick (such as you get with an order from an Asian restaurant)

optional
1 qt. sized glass mason jar, plus lid, one piece or a ring and top.
vessel for holding 4 cups of sugar
one separate measuring utensil for the water
one separate measuring utensil for the sugar

Also helpful if not already in a kitchen -
a dish pan of hot, soapy water standing by to immediately soak used measuring cups and sauce pan in. Trust me.

in case you don't have a skewer and a clothes pin...*
a clean length of cotton string
a pencil
a clean paper clip

I opted not to use food coloring or flavoring. Mostly because I didn't want to make a special trip to the store this morning.

2 cups (500 mL) of water. I used cold water straight from the tap.
I set the burner (it's a gas stove) on Medium heat.

My very large mug and a small, 2# bag of sugar.
I measured it out ahead of time into the mug to make sure I had the right amount.

measuring out the sugar


The water +1 cup of sugar

water (obviously boiling now) plus 2 cups of sugar
it is important that the water is hot enough for the sugar to dissolve, but not boiling so much that the sugar is forming bubbles and threatening to overflow the pan. Keep the heat at medium or slightly lower, and KEEP STIRRING! This might be a good time to dampen your skewer or string, since there is already sugar in the water. A skewer is very easy to swirl around in the syrup, and can be set aside in it's small mason jar until the syrup is finished.

adding the rest of the sugar.

Now we are at 2 cups of water + 4 cups of dissolved sugar. It feels fairly syrupy at
this point when stirring. again, make sure the sugar is dissolved - none should be visible.

Before pouring the syrup into the experiment container (ie: small mason jar), it is a good idea to have something underneath it to catch any spills. The jumbo mug is the perfect vessel since it already had sugar in it. The skewer and clothes pin do not need to be in place, in fact, it's more helpful if they aren't.

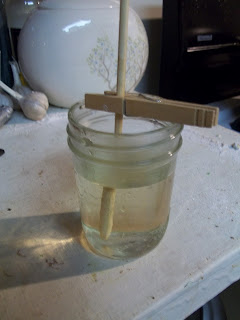
the treated skewer submerged in the sugar syrup with a little space between
the end of the skewer and the bottom of the jar

The materials sacrificed on the alter of science being immediately cleaned with dish soap and hot water. Crusty sugar syrup is a nasty mess to clean up when dry.

*I hate putting this at the end, but I wanted to get on with the pictures. 
The string, paper clip and pencil are in place of the skewer and clothes pin, either are for the sugar crystals to form on.
For the string method, tie one end of the string to the paper clip, and the other end to the pencil. Dampen the string in a little water and lightly coat it with granulated sugar (this will help the crystals latch on) When the syrup solution is ready, submerge the paper and string into the liquid, and roll the string up until there is about an inch of space between the bottom of the jar and the paperclip when the pencil rests on the top of the jar.

Whether or not a skewer or a string and paperclip is used, it is important to set the jar aside somewhere out of the way. If the liquid is agitated, the crystals won't form.

Friday, March 30, 2012

3 Rivers Quilt Show, Part 4, or all the small stuff


 "Rainbow Diamonds"
47" x 48.5"
S.M., Carnegie, PA


"Seasons"
                              16.5" x 45.5"
                             S.S., Mars, PA


This whole piece makes me think of Haiku poetry. I'm not sure why.


"I Love the Desert"

18.5" x 27.5"
A.C., Pgh, PA


"VFW Special"
41" x 41"
P.G., Bethel Park, PA


"Log Cabin Sunny Side Up"
42.5" x 42.5" 
V.B., Pgh, PA


"Scrappy Vines"
8" x 9.5".B.N., Canfield, OH


This one takes the tiny cake.

3 Rivers Quilt Show, part 3

These are quilts I'm pretty sure I saw the weekend before at the North Pittsburgh Quilt Guild Show in Ross Twp, but had forgotten my camera. I have some photos from that show on my mobile phone, but they're terrible. These are much nicer, as I had a better camera this time.

 "Sienna at Chataqua"
32" x 45" L.S., Glenshaw, PA


"Star Crossed"
54" x 44", K.J., Allison Park, PA


 "Scrap Pathway"
80" x 91", L.S., Glenshaw, PA
(Same maker of "Sienna", above)
circles...or squares?


3 Rivers Quilt Show, Part 2

Starting with the 100's which are classified as the THEME quilts; this year's is Irish Chain.  


                              "Celtic Chain"
                                 32" x 40"
                             P.G., Pgh, PA


"Spring Irish Chain Quilt"
74" x 74"
M.H., Cambridge Springs, PA
(YAY, CMBRIDGE SPRINGS!!!!)


"Scrappy Irish Chain"
95" x 102"
K.A., Bethel Park, PA
Member, TRQG


"Rush to Spring"
82" x 82"
B.J.S, Pgh, PA
Member, TRQG

"Stamp Happy, Irish Scrappy"
100" x 100"
K.B., Aliquippa, PA 


"Watermllon Bliss"
97" x 113"
D.M., Coraopolis, PA

if D can enter a quilt at 113" when the entry form says no more than 100" max width, I should be able to enter the Ocean at 110". *peeved*.

Live and learn and there's always next year.


"Oriental Chain"
87" x 92"
D.M. (same maker as above), Coraopolis, PA

I don't know what this is, but I loved the Lily of the Valley detailing in the quilting and the applique in the corner.

*cannot confirm with out help*
#123, "Spring Irish Chain"
76.5" x 75.6"
M.R., Pgh, PA


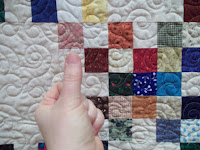
This is tiny. I mean, tiny-tiny-tiny I couldn't get the whole thing in frame and put my thumb up as a reference and get the picture to come out clear. This whole thing was pieced, doesn't look like there was any "cheating".

"Doll Crib Quilt"
13" x 19.5"
A.D., Mt. Lebanon, PA

3 Rivers Quilt Show, Part 1

Going on this weekend is the Three Rivers Quilt Show! WOW! I knew people when I was growing up who would drive two hours to see this show, and now I know why. Incredible! This first installment are the quilts that I (whoops) didn't get information for, so I have no idea who crafted them, what the dimensions are... nothin'.I sincerely apologize for that oversight, but I didn't have a writing utensil with me to make notes in my program, and the camera card was full.


 There was Arabic [?] embroidered in the two hexagons on the bottom, but I don't know what it said. The piecework on this one blew me away, and I'm curious if this project stemmed from family ties or a photograph of something from a vacation. I should have read the placard next to it, and I didn't.


A lot of careful grain work went into this piece. A lovely pallet of neutrals paired with black.


"Trapunto-like" was the description of the quilting on this piece, which was remarkably dense in some places, no doublt aiding to the Trapunto effect. 


No, you're not wrong, these aren't pieces being judged in the show.  The two quilts were acting as table cloths at vendor stalls, and I liked the patterns. The chair, admittedly, made me groan, but being the DIY-er that I am, I decided that, with just the picture as reference, I could probably figure out how to rejuvenate a sad folding chair begging for new life without first spending $8 on a pattern. And if I ever get into an elementary classroom, this would be something fun to have around.