I've had the pleasure of substitute teaching this week*. So far, every day. I was rabid about getting in the subbing system so that I could sub for one specific person - one guess who - mostly because she's awesome and I know the kids in the class and the routine and the school and ... need I go on? Like most things in my life, it took longer than I thought to get into the system. But I'm finally in. And I see the kids - but not Miss Honey - on Friday. Can I contain myself? Well, there's not going to be witty sarcasm and random "Oh, hey, you'll love this!", or a prep period music party [because someone had never heard the song "Thriftshop" before - and it wasn't her]. Because that was fun. And that, that I will miss.
I got a call back from my very first assignment for a half day. But some of those kids will throw you under the bus, particularly if you left a note about them being really helpful. Funny story, and yes it has to do with being thrown under the bus. Here's the set-up [of me]. The students were supposed to be using computers for an in-class assignment. I helped pass out the laptops, settled some technical issues** and began making the rounds to make sure everyone was on task.
Beware of counters serving as barriers in the classroom. Two students who I did not see had made for seating behind this barrier like jack rabbits, and as soon as I came around the corner, in typical third grade fashion, they started acting suspicious, but not smart enough to cover up their tracks [Thank God]. One of them was using google image search to look up cosmetic ads, the other was playing educational games. K then. We had a chat about what was approp, I moved seats to some place high vis and we moved along. And there might have been the threat of a call to the principal, the president and the teacher thrown in there. Fear of God instilled. The regular teacher had a meeting they needed to return for, so I shared what happened, and there was a quick conference call home [even better than the principal!]. Apparently, on a recent visit to a major city, the student saw a billboard advertisement for cover girl makeup. And clearly it must have left quite an impression. And yes, the parents were going to have a talk with their child. Okay! Well, at least that's all it was, but nonetheless. It was third grade, which makes me wonder at the visual and psychological differences of advertisements between an area with the population density of Pittsburgh or Cleveland and some place like Chicago, Los Angeles or New York. I mean really, I know they are different, I've been to London and Paris, and there is a lot to be said for the shock value, which I'm sure the residents don't even think of, because they are desensitized. Or maybe it's just me, but I find the objectification of women in advertisement to be sickening. So I avoid it.
If it were earlier in the school year, I might be leaving with the general notes something that says, "Great group of kids, I'd love to come back" Here's my number, call me maybe, but it's the end of the school year - all these kids are moving up so it will be a fresh face bunch the next time I walk in those doors. In fact, someone else I subbed for is changing buildings; I'm not sure if they will be with the same grade. Though I would in fact, love to come back in the fall. As today's teacher empathetically said "Got your paperwork just in time to be... unemployed." I do have a part time teaching gig this summer, but I'm still looking for more employment. And there's nothing quite like the sting of "You're just not quite what we're looking for." [Is it the master's degree?] I have my clearances. I'm a great house sitter, and I love to walk dogs. Cats also love me. So do most small children. Sayin'. What am I looking for? At this point, anything legal that I can reasonably transport myself to.
*kindly remember that all names have been changed or omitted to protect the innocent, guilty or random bystander. **Some of the events have been changed to protect innocent bystanders as well.
Wednesday, May 29, 2013
Thursday, May 23, 2013
the little class quilt that could, part 3 [I think]
my graphic designer friend and I were wandering around Lawrenceville a few weekends ago and we found this place that prints children's art work on clothing. I asked them what it would take to swing printing for a quilt and whyfor, and they said it wouldn't be a problem, but the images would need to be formatted. My GD friend edited the images into PDF format so that they could be printed out two by two. I'm very excited about this since I had been struggling with the initial format bleeding colors, trying to scan and print the images and then my printer deciding not to work - you can read about the initial entry here , the quilt fail here, and what I tried to do to solve the problem in the first place [unsuccessfully] here. I told them when school was out, and that I wanted the project done before then. They say that this should all be done and dusted before school is out.
Why am I holding my breath? Have you met me? Given how long it has taken for several other very important things to occur or for me to secure in the last few weeks, I'm waiting to hear that something has happened and that the process has stalled and they're very sorry but... I'm not trying to be pessimistic, but I'm also trying not to get my hopes up. It has been one thing after another around here, and I could use some good news.
Just got an email - the person I talked to about this is out of town until next week, so I'm not seeing any action on this until she gets back, because she's the one I talked to and knows the most about it [reasonable enough]. Sometime next week. Which means my students will likely not see the finished product while they're all still together as a class. Because I'm missing the most important element of this project. Headdesk. Live and learn. I may do this again, if I ever have my own class. But I will start in September. Or by then I'll have the bugs worked out of the process. It's all about learning, right? From your mistakes, right? [And making no promises.]
Here's a bit of good news - I finally [FINALLY!] got my did-everything-I-needed-to-do letter thanks to the guy at the graduate student affairs office who I swear has magical powers. And kapow, I am subbing tomorrow in a 3rd grade classroom. Not my kids, not even the district I was in when I student taught, but 3rd grade, which was actually what I had been hoping to student teach in initially - and then I found out where and what my placement was all about and my first thought was, great, 1st grade, again - and I have to drive where? Huh? [And shh, don't tell anyone, it was the best thing ever!] But no, seriously.
Wednesday, May 22, 2013
those happy little places
applying for a more permanent job of any kind has been less than... successful. "You have a wonderful skill set, but you're just not what we're looking for at this time..." It would probably help if I showed up in person and smiled. But I've been occupied chasing down things I shouldn't have had to be chasing down.
The best piece of advice I've had through all of this incessant waiting is to maintain some sort of schedule, so on Thursdays, even if I don't have anything to work on, I go quilt. I know, quilting without actually quilting... just go with it. Last week the Graces helped me baste a top, which is to say for those of you who don't quilt, we stitched the top, stuffing and back together with big stitches to keep everything from shifting for while I work on the smaller, pretty stitching.

The best piece of advice I've had through all of this incessant waiting is to maintain some sort of schedule, so on Thursdays, even if I don't have anything to work on, I go quilt. I know, quilting without actually quilting... just go with it. Last week the Graces helped me baste a top, which is to say for those of you who don't quilt, we stitched the top, stuffing and back together with big stitches to keep everything from shifting for while I work on the smaller, pretty stitching.

We're not really sure how old this top is, but we're placing it somewhere in the 1960's -70's [ish?] It's an 81 x 92 inches Attic Windows, which will fit on top of a Queen size bed. My Uncle asked me to quilt it; it was done by his mother. And that is all I know about that. That and it's going to take a while, because it's a monster. And I'm super grateful for their help, because there's no way I would have gotten this basted by myself.
Sunday, May 19, 2013
fabric image transfer part 2: ironing
So, you made it back! What's this all about? This is the second instalment of a tutorial on how to make fabric sheets for your printer. The first instalment dealt with how to treat the fabric so that the colors would set and not bleed or run when exposed to water. Or coffee, tea, any other liquid. If you StumbledUpon this, or for whatever reason can't scroll down to the previous instalment and you are curious, here is image transfer part one. Of course, if you have a laser printer and not an ink jet, you don't have to worry anyway - you just have to load the fabric sheets. And I envy you. For the rest of us, we have to take more drastic measures.
If you're new to this, and you want to make a printable fabric sheet for your printer, what are you going to need? Do you want it to be permanent? See part one first. But I'm using professional photo inks, not the cheap-o ink cartridge, you say, it'll be fine. Trust me. You need to be a little more drastic if you aren't using a laser printer.Give photo ink development a few more years, and we probably won't need the stuff from the previous post. If you still don't care about it being that permanent, keep reading.
Then all I had to do was cut a 45" long piece of freezer paper. Now, iron the two together.
This part takes a little getting used to. The setting on the iron will need to be set high for cotton. Unless you bought a 50/50 cotton poly, in which case tone the heat down. Make sure you are ironing with the paper part of the freezer paper on the board and the coated part of the paper touching the fabric. The freezer paper will not immediately bond to the fabric, so just check the edges to make sure it's binding. Continue ironing the whole strip; you can go back and check for air bubbles later, working them off towards the edge. Once you have your strip, you can cut off whatever size piece of transfer paper you need. Need a banner? You are set. Want to print two images that are 6" square side by side with some space between them? Oh, hey, you'll need a piece of fabric longer than 11". And you can do that. If you'd have bought the pre-packaged deal, no such luck.
I will post a third instalment a little later on running these through a printer. Keep an eye out if you're interested. Maybe track down friends with photoslhop/ a nicer printer than yours if you don't have itand consider shamelessly bribing them with food/babysitting/dishwashing/a new ink cartridge
If you're new to this, and you want to make a printable fabric sheet for your printer, what are you going to need? Do you want it to be permanent? See part one first. But I'm using professional photo inks, not the cheap-o ink cartridge, you say, it'll be fine. Trust me. You need to be a little more drastic if you aren't using a laser printer.Give photo ink development a few more years, and we probably won't need the stuff from the previous post. If you still don't care about it being that permanent, keep reading.
Materials
- Fabric [100% cotton]* - I can't stress the cotton part enough - why later
- Freezer paper [it does have to be freezer paper]
- iron
- ironing board
- fabric scissors or rotary cutter, mat
- [acrylic] ruler
Okay, why 100% cotton. When you go to the store to buy your fabric, there are going to be a bunch of choices for you. You may even ask the sales associate for some assistance. And not to insult their intelligence, but fiber content might not be their specialty. Paint or crochet might be their strong suit. So why cotton? My first, first go round with an image-onto-fabric, I bought a 50/50 cotton polyester blend. And when I went to iron out the wrinkles, the squares puckered because the polyester, which is basically plastic, melted. And I didn't have my iron set to the highest setting. Cotton will not do that - the label on the bolt of fabric will tell you what the fiber content is [your clothes will, too, what they're made of]. I was using a different medium than the one described in part one of this tutorial - I've had much better success with this.
Procedure
First, figure out how wide your freezer paper is - the box will tell you this - it'll be the smaller number. Mine is 18" wide. When I cut my fabric, I cut from selvage to selvage - these are the finished edges - giving me a strip of fabric that was 45" long, and I cut it 18" wide so that I had something the same width of the freezer paper.Then all I had to do was cut a 45" long piece of freezer paper. Now, iron the two together.
This part takes a little getting used to. The setting on the iron will need to be set high for cotton. Unless you bought a 50/50 cotton poly, in which case tone the heat down. Make sure you are ironing with the paper part of the freezer paper on the board and the coated part of the paper touching the fabric. The freezer paper will not immediately bond to the fabric, so just check the edges to make sure it's binding. Continue ironing the whole strip; you can go back and check for air bubbles later, working them off towards the edge. Once you have your strip, you can cut off whatever size piece of transfer paper you need. Need a banner? You are set. Want to print two images that are 6" square side by side with some space between them? Oh, hey, you'll need a piece of fabric longer than 11". And you can do that. If you'd have bought the pre-packaged deal, no such luck.
I will post a third instalment a little later on running these through a printer. Keep an eye out if you're interested. Maybe track down friends with photoslhop/ a nicer printer than yours if you don't have it
Hey there Miss O, where are the pictures?
I'm working on that. I had a busy weekend. I helped move a house, a friend graduated There was a lot of catching up with a lot of very important people, not the least of which was 23 of my students and Miss Honey... I may have strep now... of course, it may also be something less drastic... You'll get the tutorial pictures, gimme a chance to recoup.
Friday, May 17, 2013
the zoo
elementary kids. plus the zoo. plus fabulous weather. equals a great day. also, being represented as a stick person in their journal as the highlight of their day. at least three retired educators have told me that I will always remember these kids; they proceeded to rattle off the names of students from their student teaching experiences 30, 40+ years ago effortlessly, describing attitudes and quirks of the individuals. the only group of students that will impact me more, they all say, will be my first class, the ones in my first classroom when I'm not a sub anymore. and flying by the seat of my pants. they say this with a wink and a smile.


Thursday, May 16, 2013
gypsie progress
In the last gypsy instalment, there was no purple in the quilt - here's the center medallion sashed in purple. No, this is not what I worked on yesterday. I worked on certification stuff yesterday


...And here it is with a little bit more. You're looking at the middle sideways, by the by. The various pieces of the two ends are pinned and need to be sewn.

And, here is the rest of it. Done and done, the two ends attached! It's not so much a throw anymore.

Wednesday, May 15, 2013
certification and other might-mares
There's a hitch [again] with my certification over paperwork listed and described simply as "Other". No one, as yet, has been able to explain what "other" means. I'm a bit put out by this, but since most of the communication has been via email, I'm thinking it's time to show up in person at [grad] school and show people what I printed out. [Printed from someone else's computer because my printer has now decided that taking a half an hour to print a page with a sentence of type on it is a fabulous idea. Sorry - I'm trying not to be snarky]. First the hold up was a physical form - where's the old physical form that is still current [AWOL], where's the form on the website, when can I get into my doctor... Now it's "other". Someone missed the lesson about not defining a word with itself in the sentence.
I might be able to sub before the end of the school year. I might not. I might get my placeholder letter in time. Then again...
I've also been trying to apply for part time jobs with corporations at this time. Why not a real teaching job you ask? See note about the placeholder letter: no letter, no proof that I completed my program. I need that letter. It's a little discouraging. I know if I apply to enough corporate jobs that someone will call me back. This placeholder letter is a little more time sensitive.
Monday, May 13, 2013
image transfer - a tutorial, part 1: treating the fabric.
As stated in some of my previous posts, I've been toying around with transferring images to fabric. In the most basic of ways. I'm not trying to layer images on top of each other or anything fancy just simple, basic here's a picture, now print.
There are image transfer sheets which you run through your printer and then iron on - this isn't what I'm talking about. There are also prepared fabric sheets that you run through your printer and peel off a paper backing. This is more along the lines of what I'm talking about. When I went to price the prep-fab sheets, they got very expensive for a large scale project; the pro is you pull them right out of the package and they are ready to go straight into the printer; they are, however, pre-cut to 8.5"x11". So if you have access to a bigger printer or [oh, boy!] a plotter, this might not be the way to go. Another considerations is that the pre-made package sheets are made of something called percale - this is the same thing that your bed sheets are made of. It is a denser weave than quilting fabrics, which is great when you're sleeping on it, but not so great when you are trying to sew it together with something else - quilting fabrics and bed sheets generally do not get along with each other. You can make it work... but, sometimes, there are problems, either immediately or down the road.
My purposes suggested that making my own fabric sheets would be the way to go. Why? I could cut strips and then cut them to any size I wanted to - say 8.5 x 10, for a little less waste, I could use coupons and my teacher discount to the big box fabric store to get 100% cotton bleached muslin at a discount, and I could experiment with color settings without racking up the cost of the premade pages [there is a slight color outcome difference from paper to fabric that has to do with the fibers].
If you want your picture to withstand the rigors of water and washing, read on. I will be posting about how to just create fabric printer sheets in a second instalment, and will link directly to that [but if you want them to be permanent, you'd better do this, or have/know someone with a laser printer]. This is labor intensive, but like many things, might be worth the investment depending on what your project is.
To make your own quantity of washable fabric printer pages, you will need the following materials:
*Some notes:
I simply wrote fabric - remember, we're going for quantity here, not three sheets to a package. When I brought my yardage, I purchased a yard and a half of bleached muslin [this is 100% cotton] at the store - which works out to being . found it helpful to cut my fabric to the same width as my freezer paper, which happened to be 18". The length is inconsequential, since that can be dealt with later - remember, you could set your printer to print a banner if you really felt like it, and it would feed a long sheet of paper through happily without a hitch. I cut my fabric 18" wide - the width of the freezer paper - on bleached muslin yardage, and I cut it from selvage to selvage [this is the finished edge], so that I had strips that were 45" long, the width that fabric fabric is woven at.
I can hear a question now - how many sheets did I get out of my yard and a half? The following are the pictures of the second half of the yardage. So I don't know until we're done with the tutorial. The first batch made 10 sheets with some waste.
Also, set your iron and freezer paper aside - you won't need them for a good while. But you will need them.

 My bin isn't quite the right size for my fabric - I measured for my freezer paper, not my bin. But this won't be a problem. The goal is to get the fabric to take the Bubble Jet, and keep everything contained.
put on those plastic gloves and put one end of the fabric strip in the bin. The rest of the strip can be trailing on the floor or work surface - the liquid won't be drawn up the strip and out of the container. Pour some of the Jet Set in the bin on the fabric and start rubbing it into the fabric - you can see the dark spot where it's taking. You will need to rub it in, it won't just soak immediately like water. Once the end has been saturated, take the strip and fold it over the bin so that a new dry section is laying over the end, and the tail is hanging out the opposite side of the bin.

 TA DA! End of the strip! By the time you get to the end, you shouldn't need to pour any Jet Set into the bin - the layers below should be wet enough that rubbing and pressing the dry layer into them should be enough to get it damp. You can wring this mass of fabric out a little bit into the bin if you suspect you might have poured on a bit more than you needed.

Once it's dry and you aren't busy, this is the part where you want the iron and freezer paper and scissors - know where those are? Oh, well, I'm in that boat, too - go find them. I'll be back later with image transfer - a tutorial, part 2.
There are image transfer sheets which you run through your printer and then iron on - this isn't what I'm talking about. There are also prepared fabric sheets that you run through your printer and peel off a paper backing. This is more along the lines of what I'm talking about. When I went to price the prep-fab sheets, they got very expensive for a large scale project; the pro is you pull them right out of the package and they are ready to go straight into the printer; they are, however, pre-cut to 8.5"x11". So if you have access to a bigger printer or [oh, boy!] a plotter, this might not be the way to go. Another considerations is that the pre-made package sheets are made of something called percale - this is the same thing that your bed sheets are made of. It is a denser weave than quilting fabrics, which is great when you're sleeping on it, but not so great when you are trying to sew it together with something else - quilting fabrics and bed sheets generally do not get along with each other. You can make it work... but, sometimes, there are problems, either immediately or down the road.
My purposes suggested that making my own fabric sheets would be the way to go. Why? I could cut strips and then cut them to any size I wanted to - say 8.5 x 10, for a little less waste, I could use coupons and my teacher discount to the big box fabric store to get 100% cotton bleached muslin at a discount, and I could experiment with color settings without racking up the cost of the premade pages [there is a slight color outcome difference from paper to fabric that has to do with the fibers].
If you want your picture to withstand the rigors of water and washing, read on. I will be posting about how to just create fabric printer sheets in a second instalment, and will link directly to that [but if you want them to be permanent, you'd better do this, or have/know someone with a laser printer]. This is labor intensive, but like many things, might be worth the investment depending on what your project is.
To make your own quantity of washable fabric printer pages, you will need the following materials:
- fabric* [100% cotton is best]
- freezer paper - whatever brand you can lay hands on, but it has to be freezer paper.
- an iron and ironing board
- a large-ish plastic bin, preferably with a flat bottom
- plastic/rubber gloves [whatever you aren't allergic to - I used the yellow dishwashing uppity storebrand ones from the bullseye store]
- a drying rack or a flat area that can be covered with a plastic sheet
- Bubble Jet Set and Bubble Jet Rinse. Why Bubble Jet Set? I don't know the chemistry behind it, but it helps set the ink from an ink jet printer [this is different from a laser jet printer]. When ordering it, order the rinse that goes with it, because you have to wash the images after they've been printed to set the color. [You can find Bubble Jet Set + the Rinse through on-line retailers]
- Your favorite fabric scissors or a rotary cutter plus mat and acrylic ruler
- a small funnel is handy, but not necessary. I strongly recommend the funnel though. You'll see why.
*Some notes:
I simply wrote fabric - remember, we're going for quantity here, not three sheets to a package. When I brought my yardage, I purchased a yard and a half of bleached muslin [this is 100% cotton] at the store - which works out to being . found it helpful to cut my fabric to the same width as my freezer paper, which happened to be 18". The length is inconsequential, since that can be dealt with later - remember, you could set your printer to print a banner if you really felt like it, and it would feed a long sheet of paper through happily without a hitch. I cut my fabric 18" wide - the width of the freezer paper - on bleached muslin yardage, and I cut it from selvage to selvage [this is the finished edge], so that I had strips that were 45" long, the width that fabric fabric is woven at.
I can hear a question now - how many sheets did I get out of my yard and a half? The following are the pictures of the second half of the yardage. So I don't know until we're done with the tutorial. The first batch made 10 sheets with some waste.
Also, set your iron and freezer paper aside - you won't need them for a good while. But you will need them.
Procedure

Step one:
Assemble EVERYTHING in the same place you intend to prep your fabric in. Doing this in a place with a linoleum floor should go without saying, not because the Bubble Jet will stain the floor, but because linoleum wipes up easily. My bin isn't quite the right size for my fabric - I measured for my freezer paper, not my bin. But this won't be a problem. The goal is to get the fabric to take the Bubble Jet, and keep everything contained.
 Step two:
put on those plastic gloves and put one end of the fabric strip in the bin. The rest of the strip can be trailing on the floor or work surface - the liquid won't be drawn up the strip and out of the container. Pour some of the Jet Set in the bin on the fabric and start rubbing it into the fabric - you can see the dark spot where it's taking. You will need to rub it in, it won't just soak immediately like water. Once the end has been saturated, take the strip and fold it over the bin so that a new dry section is laying over the end, and the tail is hanging out the opposite side of the bin.

Step three through... whatever:
kinda like these pictures - flip from one side to the other. Don't pour any Jet Set yet, just start rubbing the dry fabric into the wet beneath it to soak up any excess liquid. [This way there is less waste!] If you discover that it's too dry, pour a little Jet Set in and keep rubbing until the new layer is damp. Fold the fabric strip over so that a dry layer is laying over the wet one and repeat the process until you're at the end of the strip. This isn't a "use more, better outcome" kind of thing though. It really is about getting the fabric damp, because it's just going to drip off.

Last step:
I have a drying rack, so I hung mine out, and yes, I had a lot of dripping going on this go round. Rather than have a mess on my floor, I propped my bin up over the bottom brace of the rack with soup cans to catch the drips. This is where having a funnel is handy - once the fabric is dry enough that it isn't dripping any more, take the bin away and pour the excess back into the bottle to use for the next project. This dried really fast; it dries faster than clothes from a load of laundry set out to dry [or maybe it's because this sits right in front of the furnace...?]. Hypothetically, if you did this first thing in the morning, it would be ready to iron onto freezer paper by lunch. Or right after lunch. If you were in a crazy hurry, you could do this in a day if you timed it right.Once it's dry and you aren't busy, this is the part where you want the iron and freezer paper and scissors - know where those are? Oh, well, I'm in that boat, too - go find them. I'll be back later with image transfer - a tutorial, part 2.
Friday, May 10, 2013
the perils of printing
okay... so I've learned a lot about printing from Crayola images. And a lot about my printer. By all accounts according to industry standards, it should not still be working or communicating with any computer currently on the market. Also, Crayola colors are hard to reproduce off a printer, and just because you have an image that is 6 inches square does not mean that you will be able to get it to print off 6 inches square. It may be bigger, or smaller, than the original size, if you are working with scanned art. And good luck if you are trying to conserve paper; that requires fiddling with bitmaps in the paint application on Windows - this is if you are working with the most basic of software. I'm not a graphic designer, so if you are a GD, I'd appreciate free software suggestions or any other digital advice. For those of you doing this by the seat of your pants like me, do not lose heart: It. Can. Be. Done.
I did, finally in all the monkeying, figure out how to get the printer to just plain work - it involved paying attention to the printer status and a lot of restarting the computer at inopportune times. AND I have a whole bunch of test batch fabric squares in a moment-of-truth test wash. One of the squares did finally reproduce true-to-color - yes there are printer lines, but it's true to color, and if this works Bubble Jet set stuff works, and the colors don't bleed or wash out it will be color fast, which is what I want. It's not in the test batch wash. I'm going to hold off and see what happens.
So if everything washes, the next challenge is getting the rest of the squares to produce true to color. I have a new ink cartridge [super helpful] but one printer setting does not fit all images. Some of the images are done with more reds and oranges, and some are more green and blue, and telling the printer to print off the blue-and-green pictures on the red-and-orange setting doesn't quite work.
Sadly, some of the test images would have been just fine if I hadn't run them through the printer a second time. Live and learn. Stay tuned for a how to prepare fabric for printing tutorial, because that's coming up. Hopefully your printer is newer than mine and talks to your computer.
And now, for the Moment-of-Truth
Thursday, May 9, 2013
a little progress update...
I have to share that last August I was hospitalized for a status migraine, and since then, I've been seeing a neurologist right regular for management of my brain's disorderly conduct. Best news I've had since I started getting migraines as a teen: in six months, I might be able to start backing off the daily treatment. As long as I keep not getting like I have been. If right now you'd clap your hands or hug your dog or something, and every once in awhile think happy no-headache thoughts, I'd appreciate it. Last year was kinda rough.
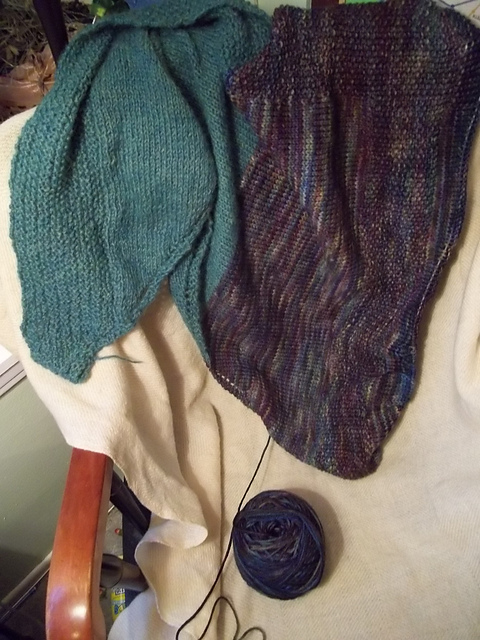 In crafty sort of news, you can find me on Ravelry. I'm not sure if I've ever made that official or not - you know, like on Facebook, pics or it didn't happen. I've been working on a shawl I found on Ravelry called Nae, and since I just passed the halfway point, I thought maybe it was time for a status update.
In crafty sort of news, you can find me on Ravelry. I'm not sure if I've ever made that official or not - you know, like on Facebook, pics or it didn't happen. I've been working on a shawl I found on Ravelry called Nae, and since I just passed the halfway point, I thought maybe it was time for a status update.
when I look at pictures of it, I'm not sure how I feel about the two color mix, but I'll just have to wait until the other end is on. The candombe is so much nicer in person - the pictures and swatches are, well, gross.
Someone told me about a yarn shop in Squirrel Hill called Knit One, and I stopped in today, and lo and behold, they had the yarn I would have needed to complete this project in one color. I was a little miffed.
As a project goes, it's a great shawl; I'm sure it will be a super warm scarf-y thing, since this is merino wool and alpaca.
And, just in case you're confused about what you're looking at, because I know I am a little, this project is knit so that it is begun at one tiny pointy end [the greenish blue side] and it gets bigger [the bit in the middle that's a bunch of different colors]. If you've got a high enough screen resolution, you should be able to tell that along one edge, there's a wide textured section done in seed stitch. That's the top of the shawl; it's been folded over itself because it's still on the needles, which are hidden on the right side of the picture. The exact center of the shawl is also worked in seed stitch, so if you look carefully, you can see the beginnings of a textured T - it's missing the right side of the cross bar. Its there, I promise. More than halfway done!
Sunday, May 5, 2013
Zigeunerleben - the gypsies
I can't hear the music anymore, so I'm thinking that the marathon is over... which means if I wanted to venture forth, I could probably do so unhindered by roadblocks.
Just pretend that there is purple in the gaping holes, k? Because now that the race is over I have to decide if I'm going to go get thread or not. Somehow I have run out of thread.

Just pretend that there is purple in the gaping holes, k? Because now that the race is over I have to decide if I'm going to go get thread or not. Somehow I have run out of thread.

In case you missed the older posts from six months ago, this is a [now modified] project from Kaffe Fassett's V&A Quilts book, called Sarah's Gypsy Throw, after a quilt from the V&A collection by a woman named Sarah Wyatt, c. 1801. This is not a throw size anymore; I don't know what it's dimensions will come out to be when it's finished. Maybe a single?
I also didn't exactly follow the directions in the book. There was a lot of "cut out these many triangles..." which made me a bit twitchy. I cut out squares, and put the right sides of the fabric together, marked the hypotenuse of the two right triangles on the back of the fabric square, which told me where my cutting line was, and used that mark as my seam allowance guide when I sewed [as if it was the raw edge and not in the middle of a square]. Triangles tend to not pull apart or stretch if sewn as a part of a square and are then cut rather than the individual pieces cut and then sewn together. Trust me, I'm a semi-professional.
Saturday, May 4, 2013
diplomas


Pics - oh, it happened.
Funny things happen at graduation - aside from random action shots of yourself waving your arms in the air. You see the other person that was placed at your building from your university in another program, and you both have one of those "Ohmigosh, whatter you doing here in the smurf blue get-up?!" moments. And you both say, "Oh. Right. We both earned Master's Degrees." JT was a cool guy. He saved my life on a couple of occasions [that pale smudge on the stairs in the first picture is actually him; our names were really close in the alphabet].
Also very random - but completely unrelated - every single one of my diploma covers; high school, bachelors, and now masters - are the same shade of red.
Friday, May 3, 2013
graduate graduation
so today it's official - I am a Duquesne University alumna [technically today at 5PM, but I'm not going to split hairs on this one].
I will however, make the distinction that I am a masters graduate, and not an undergrad. I bought that tee shirt five years ago. Yesterday, The Graces wanted to know if I bought the famous Red Ring that so many Duq grads own. I said I passed on that one - it is a very distinctive ring, yes, but I'd prefer not to not go into more debt at this point, especially over a piece of jewellry. And besides, if I'm going to own a red ring, I'd rather have a real ruby of equal size without a D etched into the top. One of the Graces, whose son is also graduating this weekend, from the Duquesne Law school, laughed and said for a real ruby in a setting, it would probably be cheaper. Her son, apparently, is not buying one either.
So, on that note, there won't be any crafting this weekend, because I'll be a little occupied with commencement [I know, pics or it didn't happen]... although, I should be getting two tops from my parent's house, and I have fabric for the England quilt. And the bubble jet set came in the mail and the fabric was treated this morning and is drying so I can do a test run in my printer at some point [God I hope it works!]
Wednesday, May 1, 2013
banning caterpillars
if you were inside today, and there was no A/C, I am so sorry... although, it probably could have been worse.
My patio was in full shade, reminding me that I really need to get the clippers and start hacking back the suckers on the verge, but I still managed to get this picture of the almost finished quilt. Almost finished because I think it needs a border, but I haven't decided what yet. It is long and narrow, and the colors really do remind me of Eric Carle.


My patio was in full shade, reminding me that I really need to get the clippers and start hacking back the suckers on the verge, but I still managed to get this picture of the almost finished quilt. Almost finished because I think it needs a border, but I haven't decided what yet. It is long and narrow, and the colors really do remind me of Eric Carle.


... Lyd, photo bomber
Subscribe to:
Posts (Atom)