My mother loves that first blanket but I'm not such a fan. Mom always wanted it to have a "more finished edge", but with it being a rag quilt, I wasn't sure what to tell her. It's not like you are supposed to bind the edges of them. I mean, I guess we could...
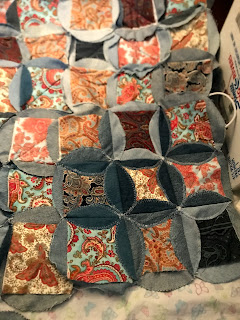
Fast forward to today. Or, rather, a few months ago... maybe longer. While trawling Pinterest, I saw another version of a denim rag quilt. This one was labeled a mock Cathedral Windows [and to be honest, I can't even find the pin now].
Eureka, I've figured out what I'm doing with the rest of the denim.
Now, if you know anything about me, you know that I also lost it [all of it, fabric, batting, the works - I even forgot I owned that rotary cutter, come to think] and found it again [except the rotary cutter]. And it wasn't even part of my 2020 Find-it-and-Gitter-Done Top 10 challenge to myself! There were no instructions, just pictures. So I had to wing it, and you get to reap the benefits.
Repeat after me: I DON'T NEED A FANCY ACRYLIC TEMPLATE.
Materials:
- A CD or Mom's Corelle. It's the one that's about 6 inches across. A CD or DVD, or one of the plastic CD size pieces that sits at the top of a spindle of blank CD's work as well, they're about the same size.
- Fabric of your choice, cut 4 1/2 inches square. You don't need batting, but I had some cotton bat kicking around, and I wanted to use it up, and it gives the quilting a little puff. It is a pain to cut with a rotary cutter, so you may want to skip it.
- Denim, cut into circles
- Pinking shears (for the denim)
Note: could you use a charm pack? Yeah, but that means the circle is going to need to be bigger, and that kind of maths is beyond me.
Figure out what size you want the finished project to be - I'm a wing-it kind of person myself, which often means I buy too much or not enough fabric to finish a project. I was going for a throw size, roughly 40 inches by 60 inches.
-I think I had the equivalent of 8 fat quarters of paisley fabric, maybe 10. I can't remember now. As for denim, I think I had 8 - 10 pants?
Method:
- Cut your squares and circles.
- Pay attention to your denim - as a twill, it has an obvious right/wrong side. With wrong sides facing, lay a fabric square on top of denim circle so that the corners of the square touch edges of the circle on all sides. If you're using batting squares, sandwich the batting square between the denim and the pretty fabric. Pin if you wish, and stitch down from corner to corner of the pretty fabric to keep things from shifting.
- Choose your own adventure - finish sewing all of the circles and squares in this manner, or begin to stitch the prepared patches together as you go. I don't recommend this if you choose to wing it, because then you may end up with a concentration of one kind of fabric in one section of the quilt, and it just looks awkward.
- Sewing the patches together -
Take two prepared circles, and lay them so that the right sides of the denim are together, lining up the straight edges of the squares. Make sure your quilting lines are going the direction you want them to, or don't. Pin if you wish. - Using the straight edge of the square as a guide, stitch along the edge of the square as close as you can without sewing the square down. Now, there should be two half-moon looking flaps of denim flopping around between the two squares.
- Fold the denim flaps down towards the pretty fabric so that they lay flat, press or pin, your choice. I used a zigzag stitch to sew down the flaps, as close to the edge of the denim as I could get.
- Repeat steps 5 -6, sewing together prepared circles and stitching down flaps. Eventually, you're going to get to the point where you have long seams and you're stitching down a lot of flaps at once - if you plan ahead, you can turn the project so that the flaps are sewn all at once.
- Once the desired size is reached, fold down the edge flaps of the project and sew down all flaps.
I'm not that far along in the process, but that's how I'm going to finish when I finally do.


No comments:
Post a Comment