This is my first attempt at drafting a tutorial, so bear with me :-) I was out picking up necessaries for an art instalation for Good Friday and I stopped at a discounted overstock store. Usually I never find anything, but aside from scoring some inexpensive and super cool sport sunglasses and athletic socks and an Easter dress and some tee shirts and--- okay, so obviously I found something[s] this time.
I saw, but did not buy, a bag much like this:
 |
| Geezum-crow. It may have been $1.99, but I really don't need ANOTHER bag. |
The caption pretty well sums it up. Smaller than my camera and made of nylon, the colors at the store were burnt umber and olive. Meh. Don't want an olive bag, though I should have picked one up, you know, as a stocking stuffer or something. It was only $1.99.
Which brings us to the drive home where I thought about a canvas bag I was recovering, and the usefulness of having it tucked in my purse, or my glove box - because you don't ever stop at farmer's markets and garage sales either, right? - but not floating around kattywampus and getting tangled up in things. So, just make one like the one at the store, Right Brain says. Okay, says left brain.
Materials:
thread
scissors
scrap fabric; two of varrying size, one that's 2" x 3"
a bag (premade, for stuffing into the stuff bag)
I started with this bag [already made], and added the log cabin block. The square is apliqued over a logo for a book store in Nevada or someothersuch. Sorry about the orientation, I can't get it to rotate...
The measurements of the bag aren't so important laid out empty and flat as they are rolled up, since that's how you'll be toting your tote around anyway.
So, roll up the bag. I trifolded this one, then rolled from the bottom up and wrapped the straps around. Bad idea.
Better idea: with the bag flat, fold the straps down so they are laying over the bag, then tri or bifold, what ever you're comfortable with. It will stuff into the baggie far more easily. For the sake of economy, I rolled mine as tightly as I could, and it measures out at just under six inches [6"] long and three inches [3"] wide. Then there's about 2" of height in there to take into consideration. I figured 1/4" seam allowances, so I'm up to 3 1/2" [two sides, remember] wide and 6 1/2" long.

But the bag baggie in the picture has a flap to keep the
bag inside, and this thing isn't flat when rolled up, so the dimensions need to have 2" added - 5 1/2". So that covers width. What about length? I used two left over scraps to make my bag, clearly they are different patterns. The shorter one is for the front, and the longer one is for the back, and will also service as the flap on one end. I said my bag was 6 inches long rolled, so I'll need to add 2 1/2" to cover the height and seams. Since we're making a flap, one piece needs to be longer than the other, but the numbers should add up to 17". The short piece is 6 1/2", the long one is 10 1/2".

Clean up one short end of each scrap by either serging or folding over 1/4" of the end and stitching down, clip your threads so they're flush with the end of the piece. I used an embroidery stitch because I like it, it shows up better, and it covered the raw edge nicely. From another, small scrap - this one is about 2" by 3", make a loop tab for the bag by folding the long edges into the middle so they meet, then fold it over again so the two raw edges are sandwiched in the middle. Stitch that puppy down along the open end - my embroidery stitch was wide enough to ensure it wouldn't fall apart. Clip your threads.

On a flat surface, lay the longer of the two scraps right side down so you're looking at the pretty side. Lay the short one, pretty side down, on top of it so the two raw opposite ends match. Pin the raw short ends together. Fold back the short scrap and lay the now folded in half loop tab below the pretty edge of the short scrap. Pin it down to the long scrap with the loop laying as shown, facing inside. Fold the top of the long scrap down so that the pretty end hits the top of the loop tab with the raw edge facing you. Finish the fabric sandwich by folding the short scrap into place over the long piece and the loop tab. Pin this together, then pin the opposite side together.
This is what it will look like after all the folds have been made - my fingers are holding down the loop tab.
This is important : fold the flip top underneath the short end. Otherwise you'll be ripping stitches, because the opening will be wrong. Lamesauce.

here it is all pinned together. The fourth pin on the bottom of the picture is the loop tab, three pins seemed to hold the sides down pretty well, spaced as they are. Let's sew this together - start at the top of the bag on either the loop tab side or the sans tab side. Stitch in about 1/2", back stitch, then sontinue sewing down the long side. When you get to the end, back stitch one or two stitches until you're looking a a small square in the corner.With the needle piercing the fabric and the presser foot UP, pivot the piece 90 degrees so you will be sewing the bottom next. Back stitch the 1/4 inch to the edge and straight stitch to the other end.
 |
| L side - sans tab..............R side with tab over here |
Repeat the back stitching process, and when you are on the third leg so to speak of the piece, back stitch after you've completed stitching the fabric together.
This is what it should look like right before you're done - I started on the side opposite the tab, and back stitched a couple of times when I got to the tab for reinforcement purposes.
*I neglected to mention that before stitching the tab down, this would be a fantastic time to add a clip, the sort with the bail on one end and a swivel head on the other. Personally, I'm a big fan of carabiners - if they break, they're easily replaceable, and you can find them relatively inexpensively... or free. I like free. A carabiner clips more easily to a belt loop, bicycle brake lines... you get the idea. And there's room for your key ring.
One last step - two, if you haven't already taken the pins out as you went, now is a good time to do that. For real this time, last step is folding the bag inside out or right side in... which ever. I did something called kimono corners so the corners would be nice and crisp and not awkward bulky as they sometimes are. A huge thank you to Clair, who taught me how to do this wilst I was interning with Porthouse Theatre in the summer of '08. Clair also reminded me repeatedly... and all summer... of the necessity of clipping dangling threads as you go.
Kimono corners

With the stuff baggie sewn together and laying flat, identify the corners. I suggested back stitching for reinforcement, but also for a first time corner maker, the seams are really helpful. This takes some
practice, mostly for coordination, but it's worth it.

See my finger? Pointing at the intersection of two seams forming a 90 degree angle? Pick one of the sides to start with, and fold it in towards the project, using the seam as your crease guideline. Now take the perpendicular side - the one still chilling out in space - and fold it toward the project so that it's laying on top of the fold you just made. You should have another 90 degree corner in place of raw edges you started with. Grab hold of that with your thumb and index finger and hold on to that corner. My thumb is covering it up, but this should give you an idea of what it should look like.
Very carefully flip the part of the bag right side out over your pinching fingers - your index will be inside now, keeping the folds in place. Don't flip the whole thing, there's still the opposite corner to fix! Repeat the fold, fold, pinch and flip on the opposite corner for the purposes of this bag.
The bottom of the bag will be turned right side in, and the top flap will still be backwards at this point. Repeat the kimono corners folds on the top flap end.
Voila! You're done! Now stuff the baggie with a bag and put it in a convenient place!


 But the bag baggie in the picture has a flap to keep the bag inside, and this thing isn't flat when rolled up, so the dimensions need to have 2" added - 5 1/2". So that covers width. What about length? I used two left over scraps to make my bag, clearly they are different patterns. The shorter one is for the front, and the longer one is for the back, and will also service as the flap on one end. I said my bag was 6 inches long rolled, so I'll need to add 2 1/2" to cover the height and seams. Since we're making a flap, one piece needs to be longer than the other, but the numbers should add up to 17". The short piece is 6 1/2", the long one is 10 1/2".
 Clean up one short end of each scrap by either serging or folding over 1/4" of the end and stitching down, clip your threads so they're flush with the end of the piece. I used an embroidery stitch because I like it, it shows up better, and it covered the raw edge nicely. From another, small scrap - this one is about 2" by 3", make a loop tab for the bag by folding the long edges into the middle so they meet, then fold it over again so the two raw edges are sandwiched in the middle. Stitch that puppy down along the open end - my embroidery stitch was wide enough to ensure it wouldn't fall apart. Clip your threads.
 On a flat surface, lay the longer of the two scraps right side down so you're looking at the pretty side. Lay the short one, pretty side down, on top of it so the two raw opposite ends match. Pin the raw short ends together. Fold back the short scrap and lay the now folded in half loop tab below the pretty edge of the short scrap. Pin it down to the long scrap with the loop laying as shown, facing inside. Fold the top of the long scrap down so that the pretty end hits the top of the loop tab with the raw edge facing you. Finish the fabric sandwich by folding the short scrap into place over the long piece and the loop tab. Pin this together, then pin the opposite side together.
 here it is all pinned together. The fourth pin on the bottom of the picture is the loop tab, three pins seemed to hold the sides down pretty well, spaced as they are. Let's sew this together - start at the top of the bag on either the loop tab side or the sans tab side. Stitch in about 1/2", back stitch, then sontinue sewing down the long side. When you get to the end, back stitch one or two stitches until you're looking a a small square in the corner.With the needle piercing the fabric and the presser foot UP, pivot the piece 90 degrees so you will be sewing the bottom next. Back stitch the 1/4 inch to the edge and straight stitch to the other end.
 With the stuff baggie sewn together and laying flat, identify the corners. I suggested back stitching for reinforcement, but also for a first time corner maker, the seams are really helpful. This takes some
  See my finger? Pointing at the intersection of two seams forming a 90 degree angle? Pick one of the sides to start with, and fold it in towards the project, using the seam as your crease guideline. Now take the perpendicular side - the one still chilling out in space - and fold it toward the project so that it's laying on top of the fold you just made. You should have another 90 degree corner in place of raw edges you started with. Grab hold of that with your thumb and index finger and hold on to that corner. My thumb is covering it up, but this should give you an idea of what it should look like.


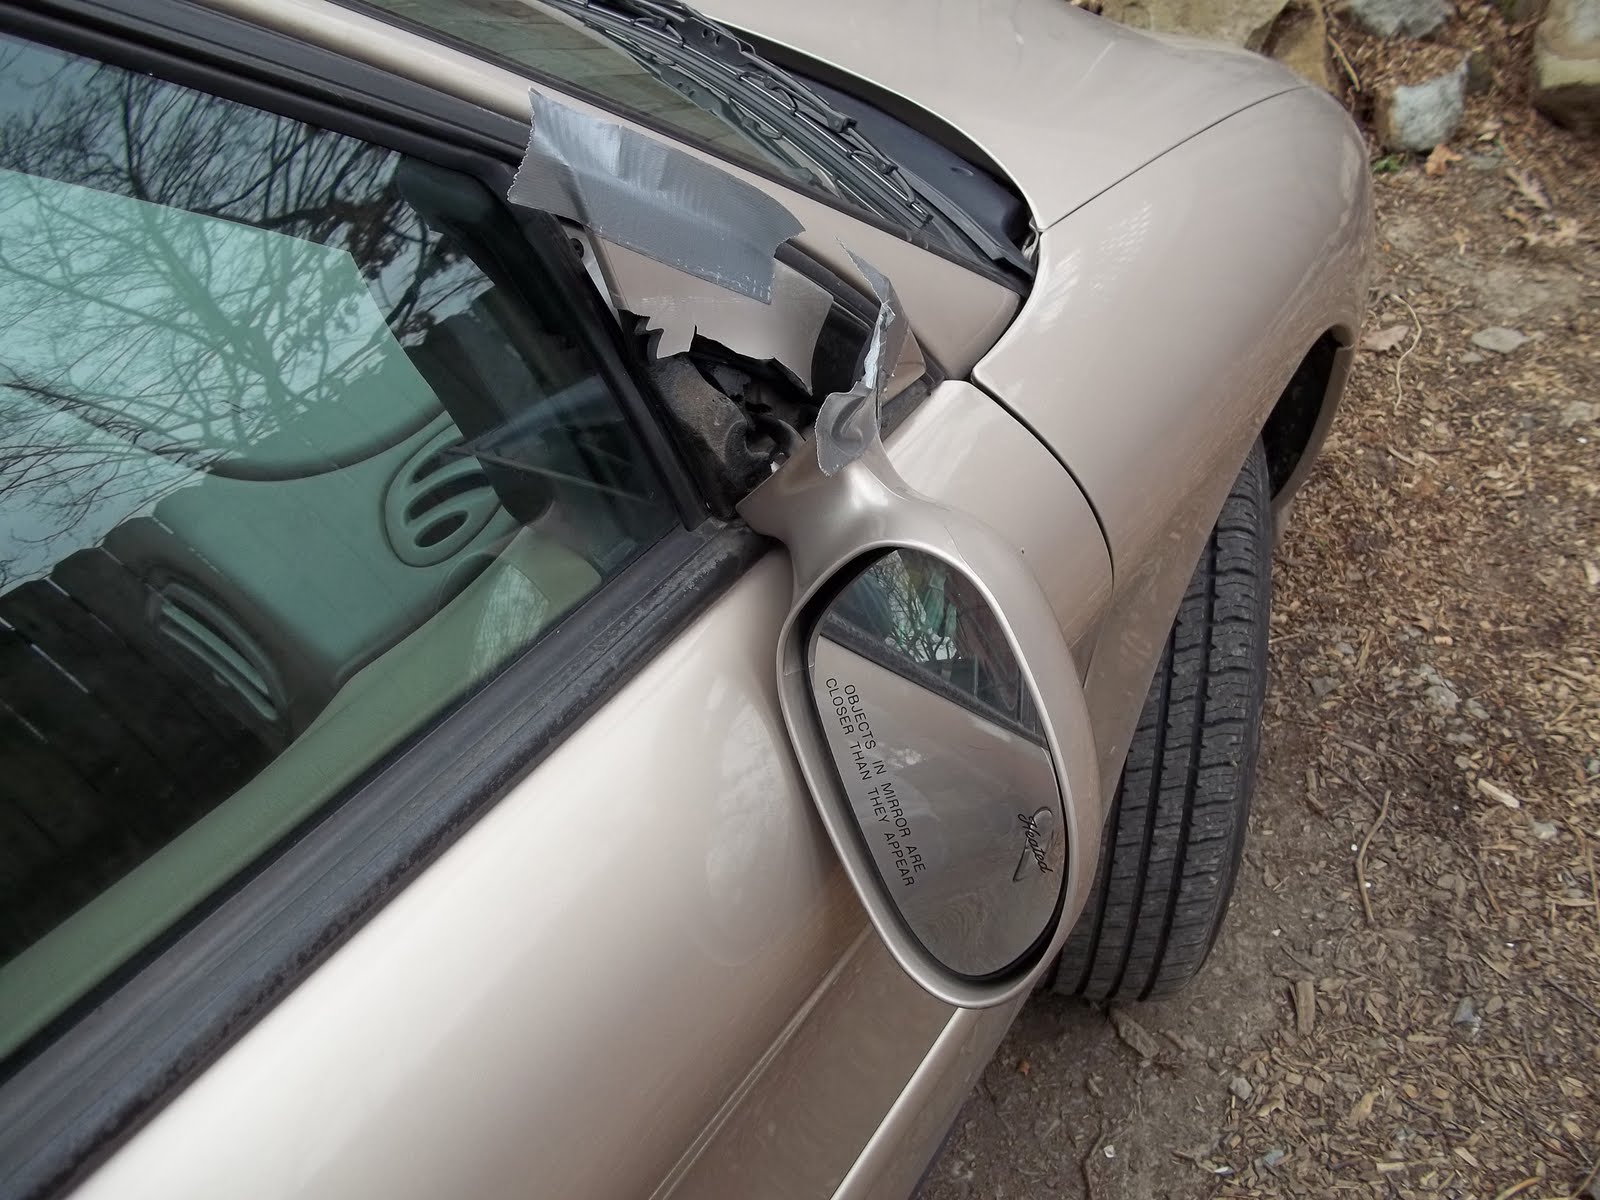

 At this point, I was chock out of squirt epoxy - since about 75% of it had hardened in the sun before I could apply it to my car. But wait! It's our good friend and close cousin, maleable epoxy! Waterweld! At the auto parts store, I hesitated getting the maleable epoxy, but now, I'm really glad I had it on hand. The fail came in when I didn't duct tape the mirror in place while the maleable epoxy set up. The good news is, now I have a contact point for another round of glue, since it's been dry all day and pretty warm.


 The count down has begun to new living arangements! When people ask why I don't sound more excited about this, it's mostly because I feel like I just bounced off a brick wall, and I'm laying on the ground wondering what just happened. I got a look at the apartment a few days ago, and discovered aqua carpeting. Not slap you silly aqua, but it's aqua, or sea glass, it's just really pale. And there's a brick - thank God it's not fake - wall adding some earthy richness in there. I thought maybe of a red or something, maybe a mustard... ugh, not with the carpet. So I found a picture of some plants in terra cotta pots (Bonus that the pots are pulling faces). I thought maybe of incorporating a grey into the room, maybe in the trim or something but then I remembered... the carpet! Yeah, it's not grey, but it's that silvery lamb's ear color, like the stuff growing in the middle, but the lightest parts. A color palatte generator spit off a very dark, muted teal as the darkest value in the strip. Which, for a basement with low ceiling clearance sounded a little, well, dark. Now, depending on how you look at it on the monitor, it's grey. Flat grey. Move around a little and it develops some personality. I have a friend who's living room is about #718264, but the ceiling in that room is at least 12' - great for him, since he's 6'4". I'm only 5'4", and I think my new celiling tops out at 8', maybe even 7 1/2. Can we say low clearance? So I looked at the value strip and saw my brick wall, #4D4B23 and #A89773, and the carpet (this is why I went for these plants) #A7D6A4... Which left me with a green and a ... is it teal? I would have said this was muted, but then I found the brightness toggle and discovered that no, these are the 'pure' shades'.
  #718264 is just going to be too dark. I have a huge window on one side of the room that looks out on... trees. And the world's tiniest, sweetest patio with a stone retaining wall on one side. And #6DB05D? I have a shirt that color. I wear it with orange on St. Patrick's day. In a room that would get more sunlight, I would have picked that green. Like a focus wall in the kitchen or something. But what about the two together? Glidden's Sea Glass Green, GLG25? It's not the rock your socks off je-ne-sai-qua at my friend's place, but I'm considering a space less lofty. It also has some heft color-wise against the lambsear carpet.

 Just facing, the duvet itself isn't lined. Maybe at some point, I will line it. Or remake it. Or whatever. In any case, a full lining seemed ridiculous where a two inch facing would do well. The end nearest my hand is sewn into the seam for the side, and tucked under. The opposite end of the hole I left the tails free of one another so that they can be tucked to cover the comforter. They should have been wider than two inches to effectively accomplish this, but that was the left over bit. It is a pretty sizable hand hole; I wanted to be sure I could get my arm in with out pulling the seams apart.


 I discovered two things about this project. First of all, when I measured my comforter, I forgot that it was slightly longer than wide, so at 12:45 [this would be AM, when clearly I'm not on my A game] when I finally got the bulk of the duvet sewn together and the comforter stuffed inside, it "didn't fit" But I was tired, so I went to bed and dreamed strange dreams and woke up at the far saner hour of 8:45 to tackle the button placket for the closure and figure out how it went wrong. So it's wider than long, I stuffed it in the wrong way. Thing #2 - the colors are slightly off in the sunlight. I thought it looked a little funny in the incandescent light of my room, but brushed it off as exhaustion. Nope, the yellow is too yellow for the rest of the fabrics. Maybe not the tomato. But the stripes aren't wide enough for the scale of the project or they are too far apart or... Or what I don't know, but it needs something. I need to percolate on that one.


