Thursday, June 27, 2013

superhero armbands

justice avenger league

Since I've been a chronic constant poster and seem to have dropped off the face of the earth, yes I'm still alive. 15 weeks with 6-7 year olds was not enough to bulk up my immune system; two weeks into the summer and I'm not sure what I contracted but I know where it came from. Moral of the story: wash your hands, wash your hands, wash your hands... which may not have been enough. My class helper is down for the count with something else.

Yesterday we made quick-and-dirty bracelets with gross grain ribbon and iron-on Velcro tabs - I didn't know this beast existed, but it made my life pretty fabulous. 12 pre-cut semi-sticky so they stay kinda put where you put them hook-and-loop tabs in a box, 90 seconds with a hot steamy iron and you're done. Ka-pow. It was something like $3.50-$4 for the box, but since we're only there for a few hours and glue takes forever to dry, being able to press an iron down for a few seconds and then hand the project over to a child was pretty rewarding for me. Also rewarding was watching them play superhero afterwards. Or superhero ballerina. Whichever.


Action shots... my one and only girl for the day, for whose bracelet we made special arrangements to stitch beads on, and another friend, fixing a hinge with a thermometer and a pair of tweezers.  


The project originally called for velvet ribbon, whereupon you took rubber stamps and embossed the velvet with the stamp image using the iron - something about laying the ribbon with the velvet fibers facing down on the rubber stamp and holding the iron on it for so many seconds... Right... Because I have a million tiny rubber stamps laying around. When was the last time you saw velvet ribbon or a rubber stamp the size of a nickel or dime? It sounds very cool, in theory! I checked around the Metro area at three different craft stores and could find neither velvet ribbon or rubber stamps. Granted, I didn't check at a specialty place in the Strip for the ribbon, but at that point in the hunt, without the stamps, there was no point in having the ribbon.

Also, when you have a class with a ratio of 4:1 boys to girls, sometimes 13 or 14:1, bracelets sometimes have to get spun as superhero armbands. But they had fun making them anyway. There were stickers involved. Lots of stickers. We had the usual hitches that made this less than ideal - not having a completely accurate head count until the minute we did the project means there's only so much prep I can do ahead of time. In this case it meant just having everything assembled, because I knew if I had made the bracelets ahead of time for them to decorate, there would have been an extra child going without.

When preparing the ribbon, I measured the length of the ribbon needed on one of the children's arms, then cut it about an inch longer. When it was time to iron, I folded about half an inch of the ends of the ribbon under the Velcro square so that the bracelets had a nice finished look. The width of the tabs was the same as the ribbon, so folding over the end and tucking it under the tab when ironing took care of any fraying ribbon. I also tried to put the loopy part of the Velcro [the softer bit, not the hook part] on the part of the bracelet that would fold over and lay facing down on their skin, because the hooks would be very irritating, especially on baby skin [it would bother me]. How do you figure this out? if you have the bracelet facing you with the decorated part facing up, the hooked, scratchy tab would be the one you put on the top with the decorations. The softer loopy tab would go on the underside - you wouldn't be looking at it.

Saturday, June 15, 2013

quilted mile.

One of the huge perks of living in below ground is that the temperature stays pretty consistent. The downside is that if the folks upstairs decide to run the air conditioning, my apartment turns into an icebox, since hot air rises and cold air sinks. I'm currently running a space heater, wearing long pants and am bundled up in a sweatshirt, and suffering from a virus no doubt brought in by one of the children at pre-school. My immune system is going to be fabulous by the fall.

Being cold [and having the chills] means that curling up under a quit to work on it is not such a big deal in the summertime. At least, in the A/C. The Attic Windows quilt needs it's edges bound, and it's all done [yay I met my deadline!]

And I've been working on another baby quilt for some cousins who are expecting a girl in September. I had a cheery yellow duvet that I had sewn up but that I was never really happy with, so I repurposed it for this, and I'm using pearl cotton to quilt it.

When I made the duvet, I bought some matching fabric and cut strips of random widths and sewed them together. When I had new chunks of fabric comprised of the old strips, I cut out new strips that were 4 1/2 " wide and sewed them end to end so that I ended up with one very long strip of 4 1/2" fabric that had many different width stripes of fabric in it. I eventually wrapped it around an empty paper towel roll until I was ready to use it.


Pearl cotton is my new favorite. As of 6/27, this puppy is finished, and just needs to be bound. 

Friday, June 14, 2013

travelversary

I can't remember when we left to go, but this June is the 6th year anniversary of a trip my friend and I took to  Britain. We booked a tour, so there was little thinking involved once we got started on the actual trip [except Oh my God, we're really in England!]. In any case, my friend and I started buying these patches of all the places we visited, when we could find one. For something to do. I think we wanted to buy sweatshirts that said "England" and then sew them on later, but for the life of us, could we find one? Nope. So my patches have collected dust for 6 years.


Until I discovered fabric that was Britain themed. 


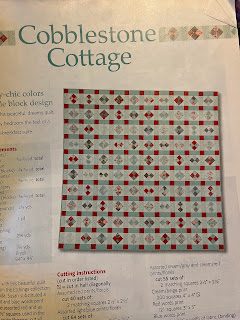
AAAAAnd there is this pattern in the May/June 2012 McCall's Quilting magazine called Cobblestone Cottage. 


Tuesday, June 11, 2013

ba ba black sheep

Last week kicked off pre-school's summer program. A friend of mine was a little surprised to find out that pre-school ran for the summer. As the parent of four kids under 7, I asked if their preschool ran a summer program; he said no, but now he was rather wishing it did, because neither he nor his wife have summers off, and they are scrambling for childcare. Let me clarify that while it is structured time similar to the regular preschool day, there is significantly less instructional time.

We do two activities a day. Most of my kiddos are going to be gearing up for preschool in the fall, but some of them are entering kindergarten. Last week, I had a full class of 18 kids. The children made a mobile collage about themselves and hearts. I didn't have a full roster until I got to school, so for the 4-5 set, the mobile wasn't the best plan without more set up; it would have worked if there were less kids.There were half as many children in the afternoon; we tackled the hearts then, and I made the project as simple as I could, since we had an hour to complete it. I'm not sure how, but this one was left behind. We used wax paper, tissue paper precut into one inch wide strips and glue sticks. I pre cut the wax paper into squares, and we had the children put the glue down on the wax paper, then lay the strips down. After they were done, the adults in the room cut out the hearts. 

This week, the lesson focused on farming. We have a community garden on site, but it rained all day, so I couldn't take the kids out to have a look at what a garden looks like, not that there's much to look at right now. So we drew pictures of what we'd like to grow if we had gardens. And we made sheep. They require a bit of prep work - unless you feel like buying black poster board, but chances are you've got a cardboard box laying around. 


All you need is yarn, springy clothes-pins, cardboard, and a bit of paint! If you feel like going crazy, you can paint the clothespins by dipping them into water thinned paint, but if you're pressed for time, they'll still come out super cute with plain colored legs. 


I cut out a sheep-y looking shape from cardboard that the clothespins seemed to match size wise. Using black acrylic paint, I pre-painted the sheep faces - again, if I wanted to go wild, the sheep could have had legs that were all over the rainbow, but that might have ended up with a preschool riot over who got what color. Know your audience. And your personal time constraints and level of concern. If I do this again with a group this big, I'm not painting those legs. Smaller group, I'll reconsider.

For the yarn, I pulled from my stash Lion Brand Homespun in a bunch of random colors that I don't know the names of [one of them is obviously green though : ) ]. It's acrylic, so there were no concerns about allergic reactions, and it's got a great natural, wooly sort of look. Also, it's slightly variegated, so the colors change just a bit, depending on what color you've got.

I made a test sheep to figure out how much yarn I needed; 4 lengths of yarn from the skein with my arms stretched out straight, plus a little extra seemed to be enough for an older child/adult, but 5 or 6 would have been better for the preschool set unless we were sitting right there helping them pull it taut. Winding the cut length of yarn into a ball should go without saying, as, with a large group of children, should just handing them a ball of yarn without giving them a choice of color. They were total troopers : )


Above is the test sheep ...

To get this started, clip the clothespins to the cardboard, and use the clothespins to hold down one end of the yarn. Now, start wrapping yarn around the cardboard! When you get to the end of the yarn, tuck it in somewhere! Ta da, you've got a sheep!

I probably could have brought along black felt or foam or something and cut little tabs for ears and glued them on, but I had already reached my limit on this project. It also looks enough like a sheep that we all know that's what it is, and the kids were super enthusiastic and wanted to play with them immediately. I will note that by painting the legs brown, I was able to use one of those black Sharpie super fine pens to write the children's names on one of the legs; aesthetically, we can still see the child's name but it's not jumping out across the room at us.  The sheep were a huge hit. 

Saturday, June 8, 2013

putting together a tee-shirt quilt; calling it done.

I have to be finished because it's going to explode if I go any further. It's a great throw size right now, and I think it can go live in my car when it's done.

What did I learn making a tee-shirt quilt? Several things.

  1. for storing the tee-shirts, cut off the whole front/back of the shirt where the image that you want is - don't trim it up, leave a lot of extra room - and discard the rest. This cuts down the pile to about half or three quarters of the original size. It's also very liberating. 
  2. mid-weight fusible interfacing seemed to work the best for stabilizing jersey. I had a variety of weights left over from several projects that I used up to make this project, so this is how I know - tried a bit of this one, tried a bit of that one. 
  3.  Having a pressing cloth to cover the image when ironing the image and interfacing together was handy, because some of the screen printing reacted to the heat setting on the iron. Or ironing with the tee-shirt facing down worked, too. 
  4. Pre-cutting the interfacing to the desired size, and then centering it over the back/wrong side of the design also seemed to work pretty well, rather than cutting out the tee shirt image to the finished size. The jersey would stretch out otherwise, but with the interfacing ironed to the image, it was very easy to cut out the design without the jersey knit material shifting and stretching out. Having about a half an inch extra of interfacing for margin of error was also a good idea. 
  5. Making sure the shirts are presorted by image size, and the largest image is measured for square/rectangle size, and the other images in that size range are cut to match it is an excellent idea. Makes for a far easier sewing experience - see how squished looking Del-a-where? looks? That's because it came into the game late and I didn't measure because I forgot about it in relationship to the other skinny text shirts. The whole project will go together easier later if there are things of equivalent size to put together, instead of a bunch of random pieces making it a jigsaw puzzle. Which makes it a bit of a challenge, if you like that sort of thing. There are a few things missing from this quilt that I can't find, but I have. To. Stop. So no shirt from my elementary school or where I student taught or my other soccer team or the Louvre or... Stopping. 
  6. For my own purposes, having templates might have been helpful, to give an idea of what the finished size looked like, once I had established what finished sizes I wanted, I could have cut squares or rectangles out of file folders or cereal boxes and laid them out over the design, and saved myself some trouble. 


Some of these shirts were hard to accommodate - the Disney shirt in the center bottom and the ruby slipper shirt in the upper left are prime example. They were awkward all around just because of their huge size. I'm sure I've said all of this before about making everything the same size, but for images that were close to being the same size, it was very helpful to cut them to being the same finished size, such as 12 1/2" or 10 1/2" square. Because not all of the graphics are of equal size, I didn't want to have an image floating in a 10" square of blank space, while next to it, the image filled the area. This is why some of my images are huge and some are cut way down; my personal taste says that it would have looked strange to have a square with a ton of empty space. I'm also thinking I should have picked a sashing with some color texture to it, instead of a solid, but maybe the quilting will make up for that.

Here are previous blog posts about this quilt in all it's incarnations - from back in February this year, December last and way back in November of 2012. I can't even remember what I was doing back then, aside from slogging through grad school.

Thursday, June 6, 2013

you are not alone in this

My grandfather's burial will be the weekend of the 21st. My mother and I had a conversation about things that had happened, or didn't, over the Easter holiday when he passed, and about the repercussions of loss. How when you lose something important, subsequent losses are magnified. Neither of us have talked about dealing with grief because mom hasn't been dealing and I wasn't talking. "Not until the end of the school year - push through it- nothing is going to stop for this." We talked about that. I am my mother's daughter, but I am not my mother. We talked about transitioning out of the end of school, saying goodbye to people, major life events and grief impacting those things.

And how we are not the same person. About that. We are not condemned to repeat the actions of our parents. How awesome is that.

Things on my end are beginning to hit their stride. Now that her school year is over, she's going to be letting this can of worms work itself out. At least, I hope she will; we're not the same person, after all.


Monday, June 3, 2013

baby, it's cold outside

It may be the beginning of June, and the first day of summer may be right around the corner, but the temperatures have been bouncing from one end of the thermometer to another. Last Friday I was at the CSE  subbing for Miss Honey and it was a sweltering 87 F in our classroom after the kids left. I'd checked the weather and had been forewarned about a lack of A/C so I wore leggings and a camisole under my sundress because the ride into work was 60ish and I'd be kneeling at desks all day; that didn't last long for the ride home.

Here we are, Monday afternoon, and what am I wearing? Jeans. Long sleeves. Socks. I came home and put more clothes on. My weather widget on the desktop says 67, but the thermometer in the window says it's a balmy 62 outside. Mmm, toasty. The room I was in today was warmer with the A/C on than it was outside. What happened?! I'll take it; I like being cold.

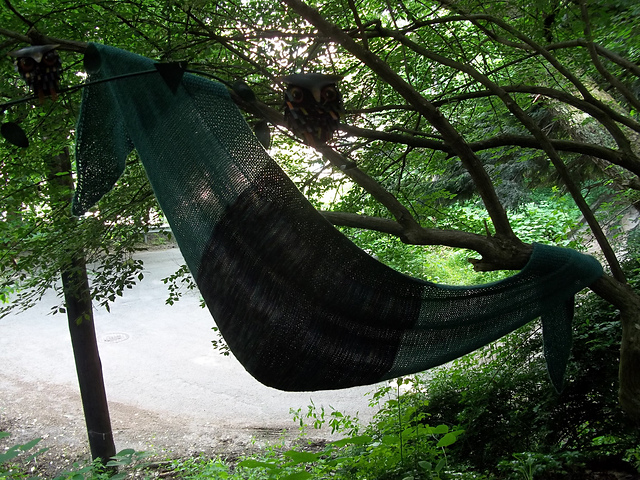
I'm snuggled up in my Nae shawl! Which is finally finished! If you are a Ravel-er, you can find it on Ravelry I think this should link to it. I think I accidently got merino wool for the one end, because [shocker] I didn't knit enough rows in the middle of the variegated and picked up knitting with the green too soon. But the color matches spot on, so it just feels a little different. And that's all I really care about. It has a gorgeous drape. It looks better on a person than it does on a tree, but there isn't anyone around to operate the camera, so I'm going to have to wait for some assistance; trust me when I say the middle section looks a lot better than the picture. Here's a link back to an older post with some progress pictures.


and yes, that is an owl. I got it for Christmas. It hangs in my tree. 

Sunday, June 2, 2013

utility quilting

A utility quilt is not really a showstopper quilt. So as I was sitting in the library grumbling about a July deadline and hand quilting a queen size utility top, two people looked at me and said "Oh, honey, don't use that kind of thread. Use pearl cotton."


Pearl cotton is a more like a type of yarn; it's twisted unlike embroidery floss which you can pick apart. And then Beth, who is always ready to drive anywhere and drives this monster of a truck said, let's go shopping! And then I got the call that my paperwork was finally in so I could sub. Sweet!  


You can really see the cotton against the black squares; it gives this lovely pop effect. I'll be done in no time.