Friday, July 1, 2011

red hots... or nots

If you're anything like me, you have difficulty finishing what you start. Or finding the things you need to finish a project. Locating things I'd say is 90% of my battle. I found a pile of precut purple squares left over from the cross-country purple charm quilt, and the February 2010 issue 102 of American Patchwork & Quilting happened to be sitting out on my bedside table. I don't have a subscription, I buy them as a reward or treat for accomplishing something... which usually happens to coincide with liking what I see on the front cover. Actually a subscription to a quilting magazine would be nice... I digress.

Here's the first on many blocks with the inspiration project. I'm not going to add the Flying Geese. Do I need to be making another top? Eh, no, but it will go by fast. The top bit, I mean, the quilting takes a little longer. Maybe I'll use it for a first time long arm quilting project. Who knows.

Thursday, June 30, 2011

Bennet. Elizabeth Bennet.

Broke down and made the Regency gown. I used Simplicity pattern #4055, view A for myself, and I made it a size - hah - 18 to fit my bust. I'm not an 18. I'm a US 14. I read somewhere a mother lamenting that patterns ran big, which thoroughly surprised me. My friend and I have sewn dresses together for years and it has been our rule of thumb to size up a pattern. Amanda is tiny compared to me, I mean tiny, and she usually sizes up, not down when sewing from a pattern. Like most Simplicity patterns I've encountered, I sized up. And to my chagrin, after hours of labor, discovered this baby still didn't fit. Unless I wore my stays. Which are totally the wrong foundation garment for this time period. Stays = French and Indian war and the Revolutionary War. Stays don't = Jane Austin. Fail.


Also disconcerting about this dress - total lack of placket to cover the back. The instructions were to create a drawstring casing around the neck line and the bottom of the bodice to draw the dress in. I will certainly be doing a little aftermarket adding to this garment, because no where, in the history of Regency clothing, was it socially acceptable to have what you wore under your dress on display to the public. I was pretty well covered but mollified nonetheless to discover that the back gaped if I did anything other than stand stock still. I realize Simplicity patterns aren't completely historically accurate. They've got the general shape going for them and the bit about tying in the back. But I'm pretty sure there should have been a placket here. I wore a similar gown to a dinner party once that buttoned in the back instead of tying - my friend had to adjust the internal drawstring on the bodice and replace the buttons so that it would fit me, but my friend's back would have been sufficiently covered by a placket had she been wearing it.

I did also make one to fit doll, out of the scraps from the dress for me. I used American Girl's Josephina's Christmas dress from the Pretty Clothes patterns, and omitted the long sleeves. Have I mentioned something about patterns running small? Oh, right, because it seems the pattern drafters at Pleasant Company had difficulty with this concept as well - the dress doesn't fit the doll! I made some bias tape to bind off the sleeves on the doll dress instead of making the sleeves long, and will have to use additional bias tape to make a Velcro placket for the back, and to bind off the hem so that the dress is the proper length. Details. Details I shouldn't have to worry about, because I followed the directions to a T and they still don't fit.

I used Halloween as a road test for the dress, wearing it at work before I wore it to a party I was invited to. I was invited to a birthday tea party, and the instructions were to bring along a doll or bear, so I brought along doll in her dress (mine was packed so I wore something else). Huge, huge hit. :)

steppy-stool. and The Hobbit

A. Love "The Hobbit". And LOTR.
B. YAY Peter Jackson!!!
C.1 Alas, however epic awesome this is for Benedict Cumberbatch (our old pal Smaug the dragon) and Martin Freeman (ahem, Bilbo) GUYS!!! Both of you?! SHERLOCK!!!
C.2 I need a steppy-stool
D. I want Bilbo's
E. But I think I'll have to make it myself, because this isn't going to be one of the "officially licensed" objects from the movie.

I was drawing up sketches last night, knowing I had seen this little guy somewhere, but unsure of the where part. And then I remembered -  The Hobbit!! My knowledge of seating and step construction being minimal compared to tables, I wasn't entirely sure how it would bear weight. Didn't look up the finer points of wood seating and steps because it was late and I really should have been asleep.

(sketches - bottom right in box is Bilbo's. roughly.)

I figured the steps would have to constructed in some sort of tongue and groove fashion. I'm not so terribly concerned with making and exact copy as I am with just liking the design of the piece. And being in need of a steppy stool for reaching the high places in my kitchen and climbing into bed. I'd probably make it out of poplar or maple. Poplar if I decided to paint, and maple because I really don't like the look of oak.

Who do I know with a router or dado blade on their table saw.....

kaleidoscope batik project

still in pieces
This project has been in the works for quite a while. I picked up the first bit of batik at Calico Corner in Erie, PA... which I'm not sure is even open any more, or if they moved (I hope they just moved).
Some of the dark blue came from the remnant bin of a fabric shop in Canterbury, England. The majority of the beige-ish fabric came from Creative Reuse Pittsburgh during their fabric and yarn sale - 70" for $2. I almost went into cardiac arrest. I knew I needed something - and a lot of that something - to give harmony to this project, and this muted mustard yellow/olive green was just the thing. The blues weren't cutting it. I'm not a huge fan of blue in the first place, but most of these reminded me of the color of water.

There are three obvious spheres in the photograph that draw attention to themselves, two sort of halvesies in the opposite corners.  I had seen a kaleidoscope quilt at a show in Erie two summers ago that had less contrast  in the overall design and a  few spheres that stood out, which I liked a lot better than a clipping of a Kaffe Fassat kaleidoscope I had saved for reference purposes. 

Free associations include

 oil on water.
opposites attract.
star cluster.
nebula.
wormhole. 
when worlds collide
Pleiades
hebrides

I don't remember the dimensions, but its about a twin. I don't like it in it's current state. It needs something to encapsulate and contain it. 


Thursday, June 23, 2011

Habitat, pt. III

All moved in. All painted. So not unpacked. Or organized, but organized is overrated... right?


Some improvements I've made:
Bygel pot rack


Quite possibly the best addition I installed myself. The wall was empty and I was out of cupboard space for my frying and sauce pans. I probably have too many. Frying pans, that is. Two cast iron, and three Revereware. One is nonstick. The bar and hooks came from IKEA, their Bygel series. My only complaint is that it didn't come with screws or drywall anchors. But given the weight this is bearing, it's better to sink the screws into a stud anyway.


A pot lid rack near the stove. Less in the arena of awesome installation, but space saving and convenient. It's a decorate plate display rack being cleverly re-purposed. Admittedly, I didn't want to get rid of it, but had no where to put it and display a plate or three, and the idea came to me when the lids tumbled out of the cupboard.


Quick and dirty [okay, very clean] cupboard cover. Clearly not a door, it's a curtain on a pressure rod. But it's pretty, and pretty handy at covering up my pile of Tupperware. And yes, the red shelving unit in there is actually a milk crate.


Also handy: this shelving unit of two separate pieces, a Barrister bookcase and a hutch. It works. The Barrister is mine, the hutch was here, and the Barrister happens to fit on top of the hutch, glory be to the Father. But I look at it and think I should get some semi-opaque frosted contact paper for the glass. Like the stuff people put on bathroom windows after the fact.


Also not installed, the computer monitor in the fireplace. The fireplace isn't safe to use for multitudinous reasons, and I looked at it as a wasted opportunity for storage... until I discovered that my desktop computer got the best wireless reception in this part of the room, and I didn't want to clutter up the table with the monitor. I have bits of fabric and books and lesson plans to accomplish that task. I did see a clever bookshelf made to fit inside an unusable fireplace. But I'm not that handy.


I'm still trying to be creative with storage solutions and organization tailor made for the space.


Oh, and cat, in her natural habitat.

Monday, June 20, 2011

K Basement, 1st installment

The fun and excitement... painting walls and trim, assembling furniture, discovering a corroded pipe under the utility sink, arranging the room, hanging curtains, rearranging the room to accommodate a neurotic desktop computer, discovering a corroded pipe under the kitchen sink, dangling by a bit of PVC, hauling three neurotic cats to church for half the day while the house is flea bombed, discovering that the plumbing under the bathroom sink is also corroded, installing a curtain wire for a faux Dutch bed, discovering the measurements were slightly off and there's a bend in the one point bracket. Fantastic.

Place looks like a bomb dropped and class was canceled for the week due to lack of enrollment. Huzzah, that means the doors can be painted. Again. 

the truth is stranger than fiction. I couldn't make this up. The pilot light will be re-lit tomorrow sometime - we had to turn it off to set off the bombs - and the plumber comes Wednesday to fix the faucets in the bathroom sink so that there's hot and cold water, the mechanism to stop up the tub works, replace the pipes under the kitchen sink, and have a look at aforementioned leaky plumbing under the aforementioned bathroom sink. Pictures to come later.

Monday, June 6, 2011

habitat, pt.II

The cart was before the horse on this one - I love furniture. Old furniture. I appreciate Ikea's modern sensibilities and streamlines but the part of me that screams to recycle and reuse says buy old. And yeah. Old can mean a lot of things; many people equate old with things like decrepit. Pshaw.

I found this on Craig's List for a whopping $25. The pain was peeling and cracking, the drop leaves were gone, the wheel on the gate leg is missing, and it looks like the top was used for a chop block. Ouch. But it was $25 and smallish. I needed a smallish table for my smallish apartment. I went out to look at it and about died. This thing is solid. SOLID. The legs and the apron weren't bolted together, they're joined, and you'd think it had been glued up yesterday. Worth the $25? Yes. Despite the peeling paint. Bonus, what I didn't know was that this table takes leaves - up to 5 leaves, in point of fact. And I picked up two for an additional $20.

what spray on stripper looks like after sitting five minutes. gross.


Frightening. But that's oak under there, not poplar. Solid. Stripping is serious business, and I've known more than a few people to get partway through a stripping job and then quit because it was more than they could handle. I didn't get all the paint off before I had to move the table, but I got most of it. The legs pose a challenge. Do I have delusions of grandeur about this project? Yep. I'm using it as my desk right now, but I imagine clearing it off and having a few friends over for dinner. Putting the leaves in it when I move on and have a bigger kitchen, or - gasp! - a dining room. Finding more leaves to accommodate my own family. Cleaning off dried bits of cereal left there by the kids. Yep. Delusions of grandeur.

upcycling 2.3

I really need to stay out of Goodwill.

Aside from buying my whole spring wardrobe there yesterday - which hopefully in 6-8 weeks will be running big instead of fitting :) - I'm in the habit of checking housewares. Because you never know what you're going to find.

Like a very sad, sad twin sized, obviously home made duvet in need of... erm... something. Sad waste of a really nice twin sheet by Nautica. Dunno if the blue baby stuff was sheeting or yardage. I suspect the yellow was a Target RE sheet... similar to the one I made into a duvet, into baby blankets. So I did what any self respecting up-cycler would: I cut it into pieces. Rolled up the blue circus animals for more baby blanket fun times later [and you know they're coming later when three of your friends get married with in 6 months of each other, starting Memorial Day weekend]

Saturday, April 30, 2011

bag-a-bag tutorial

This is my first attempt at drafting a tutorial, so bear with me :-) I was out picking up necessaries for an art instalation for Good Friday and I stopped at a discounted overstock store. Usually I never find anything, but aside from scoring some inexpensive and super cool sport sunglasses and athletic socks and an Easter dress and some tee shirts and--- okay, so obviously I found something[s] this time.
I saw, but did not buy, a bag much like this:
Geezum-crow. It may have been $1.99, but I really don't need ANOTHER bag. 
The caption pretty well sums it up. Smaller than my camera and made of nylon, the colors at the store were burnt umber and olive. Meh. Don't want an olive bag, though I should have picked one up, you know, as a stocking stuffer or something. It was only $1.99.

Which brings us to the drive home where I thought about a canvas bag I was recovering, and the usefulness of having it tucked in my purse, or my glove box - because you don't ever stop at farmer's markets and garage sales either, right? - but not floating around kattywampus and getting tangled up in things. So, just make one like the one at the store, Right Brain says. Okay, says left brain.

Materials:
thread
scissors
scrap fabric; two of varrying size, one that's 2" x 3"
a bag (premade, for stuffing into the stuff bag)


I started with this bag [already made], and added the log cabin block. The square is apliqued over a logo for a book store in Nevada or someothersuch. Sorry about the orientation, I can't get it to rotate...

The measurements of the bag aren't so important laid out empty and flat as they are rolled up, since that's how you'll be toting your tote around anyway.
So, roll up the bag. I trifolded this one, then rolled from the bottom up and wrapped the straps around. Bad idea.

Better idea: with the bag flat, fold the straps down so they are laying over the bag, then tri or bifold, what ever you're comfortable with. It will stuff into the baggie far more easily. For the sake of economy, I rolled mine as tightly as I could, and it measures out at just under six inches [6"] long and three inches [3"] wide. Then there's about 2" of height in there to take into consideration. I figured 1/4" seam allowances, so I'm up to 3 1/2" [two sides, remember] wide and 6 1/2" long.

 But the bag baggie in the picture has a flap to keep the bag inside, and this thing isn't flat when rolled up, so the dimensions need to have 2" added - 5 1/2". So that covers width. What about length? I used two left over scraps to make my bag, clearly they are different patterns. The shorter one is for the front, and the longer one is for the back, and will also service as the flap on one end. I said my bag was 6  inches long rolled, so I'll need to add 2 1/2" to cover the height and seams. Since we're making a flap, one piece needs to be longer than the other, but the numbers should add up to 17". The short piece is 6 1/2", the long one is 10 1/2".


Clean up one short end of each scrap by either serging or folding over 1/4" of the end and stitching down, clip your threads so they're flush with the end of the piece. I used an embroidery stitch because I like it, it shows up better, and it covered the raw edge nicely.  From another, small scrap - this one is about 2" by 3", make a loop tab for the bag by folding the long edges into the middle so they meet, then fold it over again so the two raw edges are sandwiched in the middle. Stitch that puppy down along the open end - my embroidery stitch was wide enough to ensure it wouldn't fall apart. Clip your threads.


On a flat surface, lay the longer of the two scraps right side down so you're looking at the pretty side. Lay the short one, pretty side down, on top of it so the two raw opposite ends match. Pin the raw short ends together. Fold back the short scrap and lay the now folded in half loop tab below the pretty edge of the short scrap. Pin it down to the long scrap with the loop laying as shown, facing inside. Fold the top of the long scrap down so that the pretty end hits the top of the loop tab with the raw edge facing you. Finish the fabric sandwich by folding the short scrap into place over the long piece and the loop tab. Pin this together, then pin the opposite side together. 


This is what it will look like after all the folds have been made - my fingers are holding down the loop tab.

This is important : fold the flip top underneath the short end. Otherwise you'll be ripping stitches, because the opening will be wrong. Lamesauce.


 here it is all pinned together. The fourth pin on the bottom of the picture is the loop tab, three pins seemed to hold the sides down pretty well, spaced as they are. Let's sew this together - start at the top of the bag on either the loop tab side or the sans tab side. Stitch in about 1/2", back stitch, then sontinue sewing down the long side. When you get to the end, back stitch one or two stitches until you're looking a a small square in the corner.With the needle piercing the fabric and the presser foot UP, pivot the piece 90 degrees so you will be sewing the bottom next. Back stitch the 1/4 inch to the edge and straight stitch to the other end.
                 

L side - sans tab..............R side with tab over here
Repeat the back stitching process, and when you are on the third leg so to speak of the piece, back stitch after you've completed stitching the fabric together.

This is what it should look like right before you're done - I started on the side opposite the tab, and back stitched a couple of times when I got to the tab for reinforcement purposes.

*I neglected to mention that before stitching the tab down, this would be a fantastic time to add a clip, the sort with the bail on one end and a swivel head on the other. Personally, I'm a big fan of carabiners - if they break, they're easily replaceable, and you can find them relatively inexpensively... or free. I like free. A carabiner clips more easily to a belt loop, bicycle brake lines... you get the idea. And there's room for your key ring.

One last step - two, if you haven't already taken the pins out as you went, now is a good time to do that. For real this time, last step is folding the bag inside out or right side in... which ever. I did something called kimono corners so the corners would be nice and crisp and not awkward bulky as they sometimes are. A huge thank you to Clair, who taught me how to do this wilst I was interning with Porthouse Theatre in the summer of '08. Clair also reminded me repeatedly... and all summer... of the necessity of clipping dangling threads as you go.


Kimono corners
With the stuff baggie sewn together and laying flat, identify the corners. I suggested back stitching for reinforcement, but also for a first time corner maker, the seams are really helpful. This takes some 
practice, mostly for coordination, but it's worth it. 


See my finger? Pointing at the intersection of two seams forming a 90 degree angle? Pick one of the sides to start with, and fold it in towards the project, using the seam as your crease guideline. Now take the perpendicular side - the one still chilling out in space - and fold it toward the project so that it's laying on top of the fold you just made. You should have another 90 degree corner in place of raw edges you started with. Grab hold of that with your thumb and index finger and hold on to that corner. My thumb is covering it up, but this should give you an idea of what it should look like.


    Very carefully flip the part of the bag right side out over your pinching fingers - your index will be inside now, keeping the folds in place. Don't flip the whole thing, there's still the opposite corner to fix! Repeat the fold, fold, pinch and flip on the opposite corner for the purposes of this bag.
    The bottom of the bag will be turned right side in, and the top flap will still be backwards at this point. Repeat the kimono corners folds on the top flap end.

Voila! You're done! Now stuff the baggie with a bag and put it in a convenient place!


Thursday, April 21, 2011

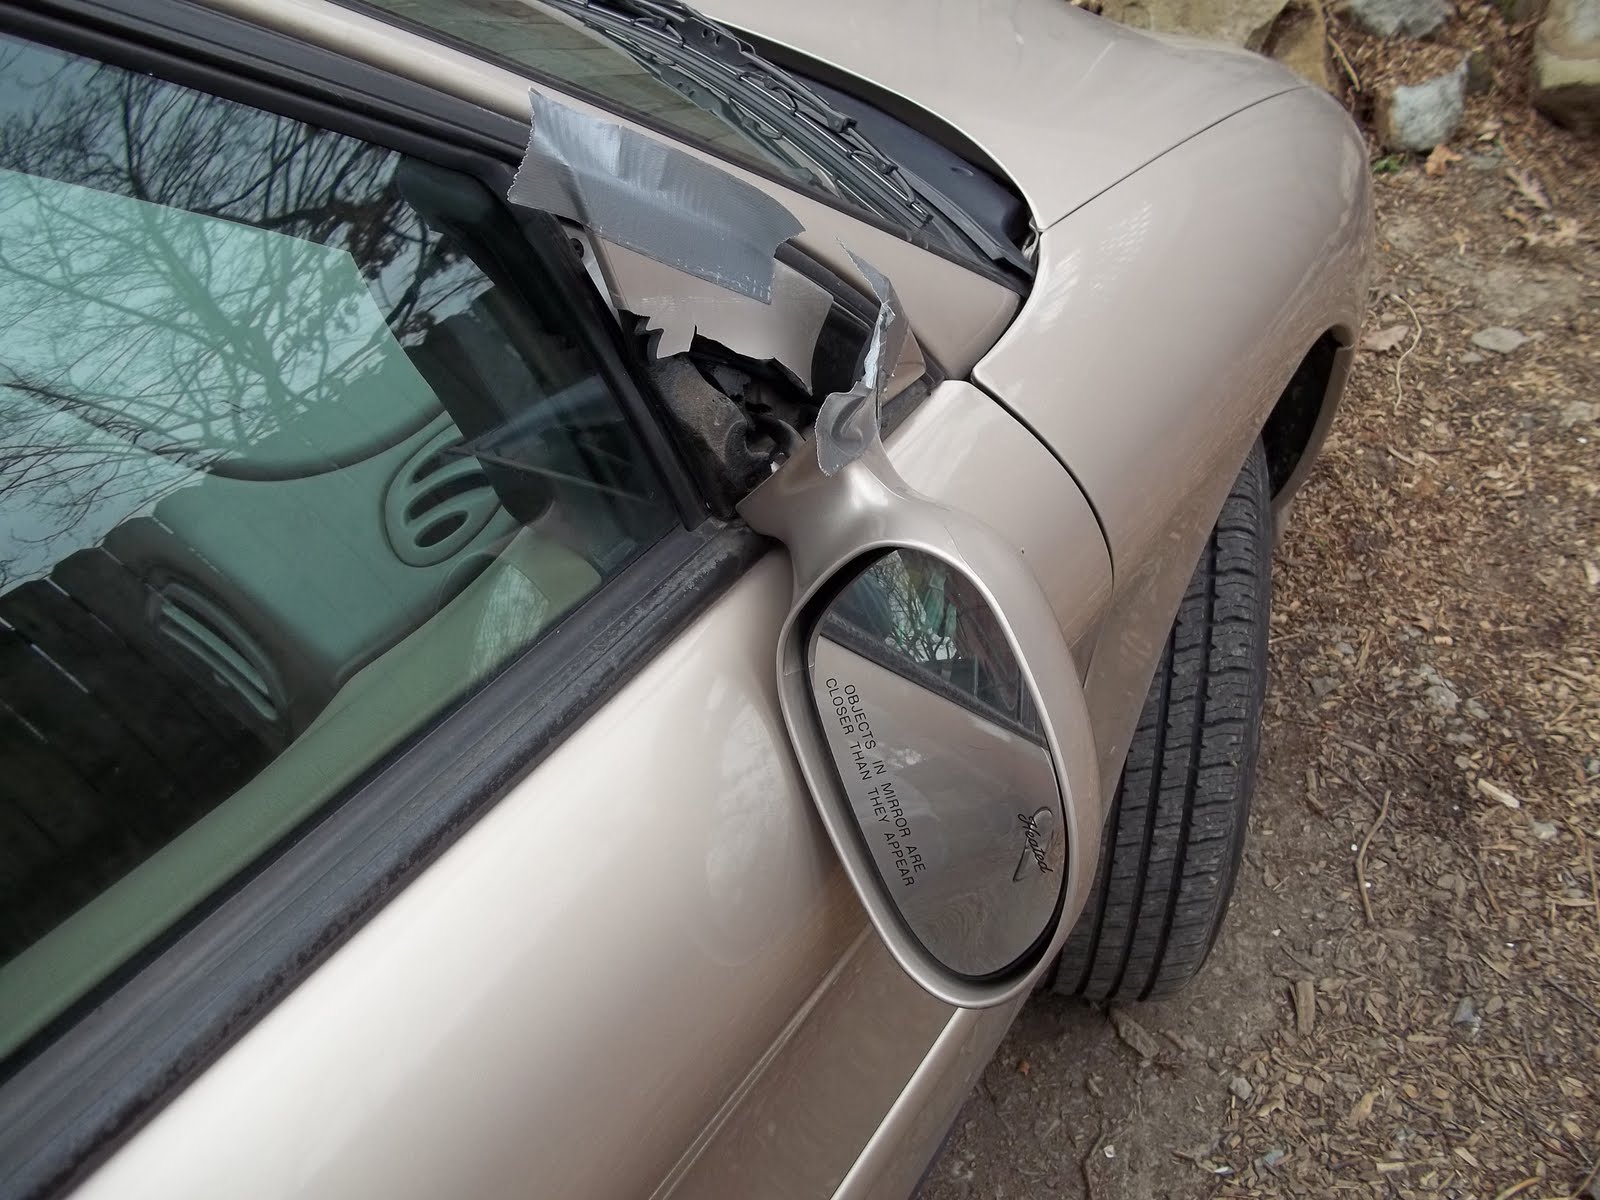
car fixin's, part II, or how epoxy and duct tape fix anything

sad, sad duct tape day
So Rusty McRustbucket came back from the auto body shop today. The broken mirror was dangling limply from it's duct tape sling, and I discerned two things:

1. Epoxy doesn't like wet and cold.
2. Duct tape hates direct sun light. [Well, so do I for that matter]


 The weather being considerably nicer today than it was a week ago, I decided to give this whole epoxy thing another shot. And learned that squirtable epoxy, sitting on the mixing palate, sets up in .3 seconds when left in the sun. This, despite the wasted epoxy, was an excellent sign. My mirror was  broken in what I thought initially was three places. But no!


The fourth broken place is hiding out under the foam insert - which is what aparently held the mirror to the car in the first place. This also explains why the mirror dangled limply off the side of the car even after I glued the mirror back together
At this point, I was chock out of squirt epoxy - since about 75% of it had hardened in the sun before I could apply it to my car. But wait! It's our good friend and close cousin, maleable epoxy! Waterweld! At the auto parts store, I hesitated getting the maleable epoxy, but now, I'm really glad I had it on hand. The fail came in when I didn't duct tape the mirror in place while the maleable epoxy set up. The good news is, now I have a contact point for another round of glue, since it's been dry all day and pretty warm.

I know what you're thinking. Wow, that looks like crap. Yeah, yeah it does. Consider the following; your mechanic and the auto body guy tell you the car won't be worth reinspecting in a year. And a new mirror is about $100 used, and that doesn't count labor. And you are under-employed. I am suddenly not above doing it myself.